Re-Creating The Hypersleep Chamber In Miniature From Alien

Today is Alien Day, the date 26 April (4/26) is a nod to LV-426, the name of the moon where the Xenomorphs were first discovered in the iconic 1979 Ridley Scott film Alien.
With 31 alumni credits across the 40-year franchise, including Alien (1979), Prometheus (2012), Netflix’s Prey (2022) and the new Alien: Romulus, The National Film and Television School is excited to celebrate!
- NFTS ALIEN ALUMNI CREDITS
Title: Alien
Year: 1979
Director: Ridley ScottAlumni Contributions:
Special Effects Technician Dennis Lowe; Art Director Roger ChristianTitle: Aliens
Year: 1986
Director: James CameronAlumni Contributions:
Optical Compositing Tim OlliveTitle: Prometheus
Year: 2012
Director: Ridley ScottAlumni Contributions:
Special Effects Laborer: Iceland Anna Lind Saevarsdottir; Conductor, Orchestrator Ben Foster; Roto/prep Artist: MPC Dillan Nicholls; Draughtsman James Collins; Production Assistant Luke Clare; Set Decorating Department Assistant Luke Hull; Assistant Accountant Paul Zieleniec; First Assistant Editor: UK Tom Harrison-Read; Assistant Art Director Tom Weaving; Documentary Camera Operator Vanessa WhyteTitle: Alien: Covenant
Year: 2017
Director: Ridley ScottAlumni Contributions:
Lighting TD Boyan Baynov, Carlo Bagliolid; Visual Effects Production Manager: MPC Carlos Ciudad; Compositor: Framestore David Simpson; Costume Coordinator Maria Salcher; Gopro Camera Technician Michael FilocamoNEW Title: Alien: Romulus
Year: 2024
Director: Fede AlvarezAlumni Contributions:
Art Director Jane Harwood; Set Designer Lizzie Osborne; Sustainability Consultant Zsofia SzemeredyCROSSOVERS
Title: Alien vs. Predator
Year: 2004
Director: Paul W.S. AndersonAlumni Contributions:
Additional Photography Adam Suschitzky; Supervising ADR Editor Ian Morgan; Coordinating Sound Editor Lauren Walker; Sound Effects Editor Miha Jaramaz; Supervising Dialogue Editor Miriam Ludbrook; Director of Photography: Second Unit Sue GibsonTitle: Aliens vs. Predator: Requiem
Year: 2007
Director: Colin StrauseAlumni Contributions:
Production Assistant Alexander MacLeod; Boom Operator: Second Unit Ken LeeTitle: Prey
Year: 2022
Director: Dan TrachtenbergAlumni Contributions:
Re-Recording Mix Technician Robert ChenMODEL MAKING COURSE LEADER John Lee
SFX Miniatures on Aliens and Alien Vs. Predator
Prop Making and Set Decoration on Prometheus
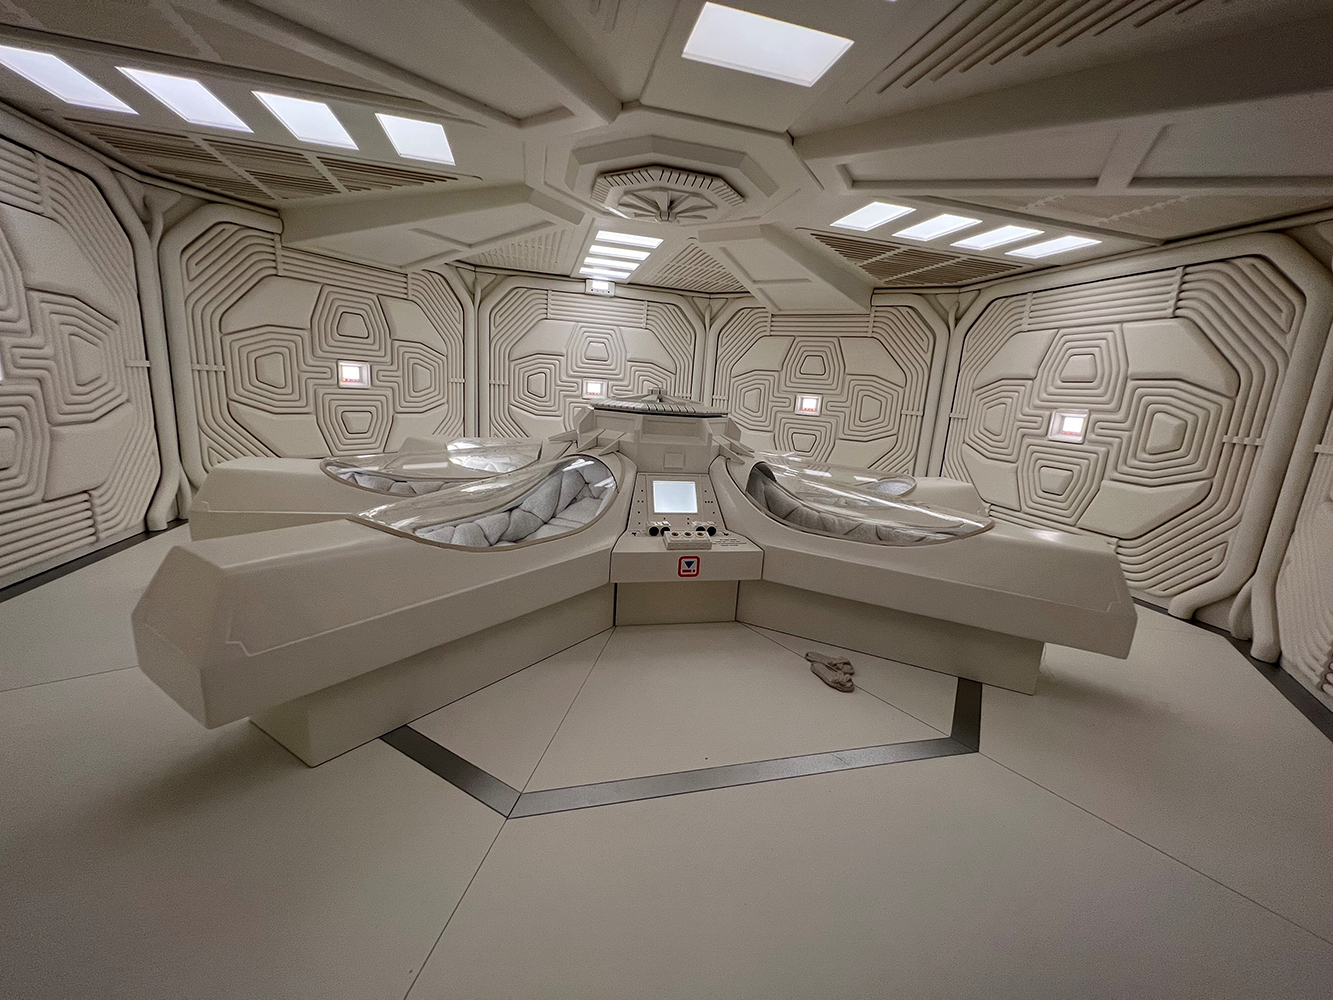
In honour of the ninth instalment of the franchise, set for release in August 2024, The National Film and Television School Model Making and Visual Effects departments chose to dedicate their replica miniature set build and motion capture shoot module to the hypersleep chamber from the legendary original film.
Keep reading to take a look at what went into the build and motion control shoot, including the live action filming to enable sleeping crew members to be composited into the miniature, including a behind the scenes film!
“We set the bar incredibly high last year by building a miniature and shooting a scene from the original Mission: Impossible film,” notes NFTS Head of Model Making John Lee, who happens to have worked on miniatures, prop making and set decoration for a number of films in the Alien franchise.
Getting Started
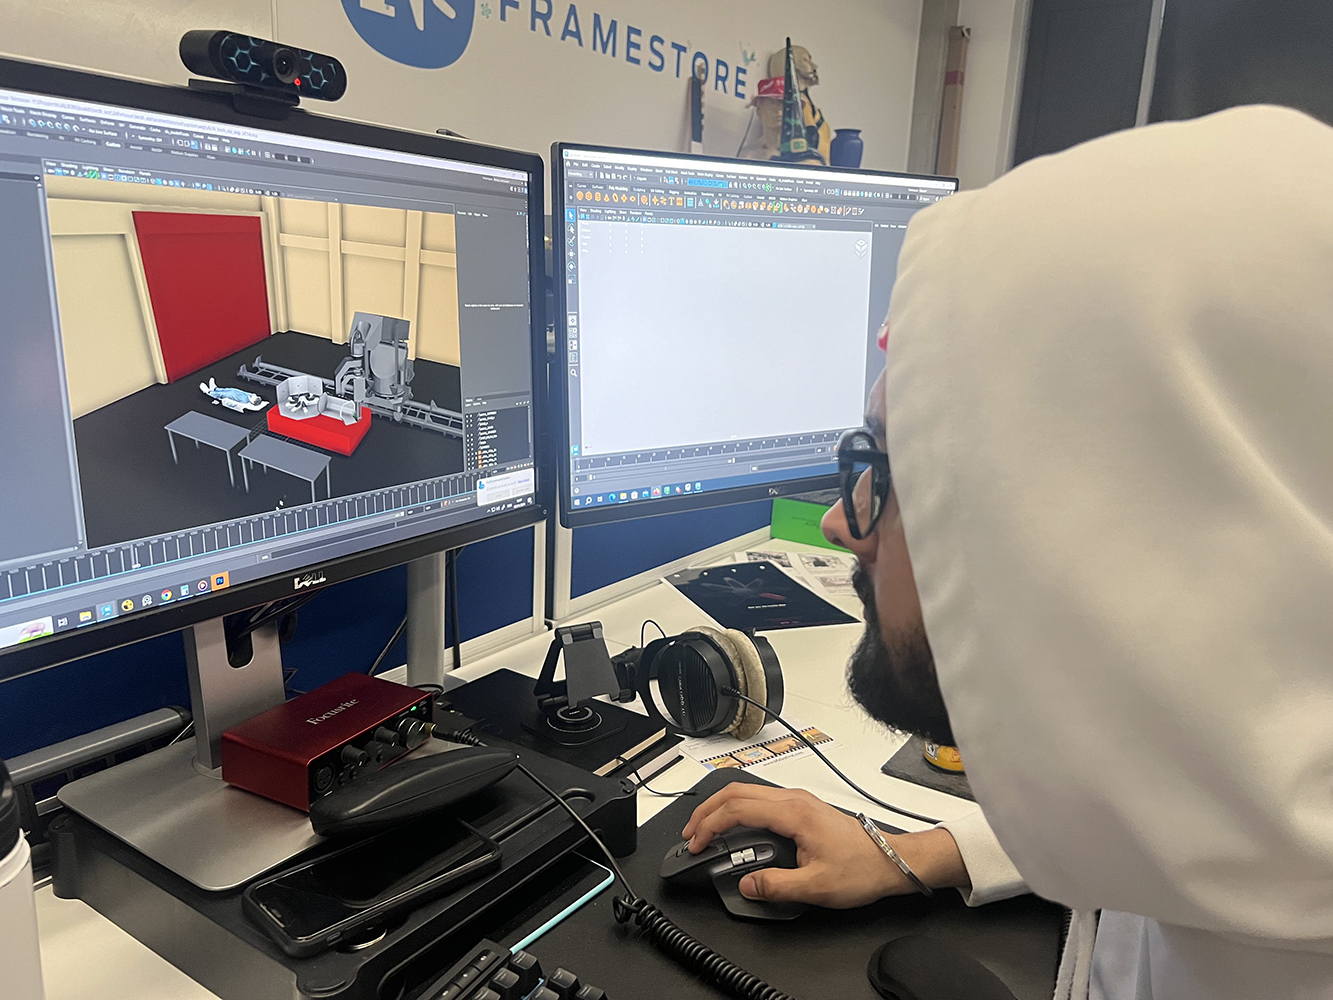
Students from the NFTS Visual Effects MA kicked off the project by building an accurate 3D previs version of the complete set to 1:5 scale (which would be the miniature build size). Previs was created for each shot, iterated and reviewed in an edit.
“Iteration and review are the cornerstones that drive our decision making”
NFTS Visual Effects tutor Ted Chaplin
A techvis pass for each motion control shot was then produced with the assistance of Take 4D’s Richard Widgery. The previs and techvis steps allowed the students to work out the following:
- How the model makers will break up the practical set to make the shooting achievable
- Which assets will be digital, and which will be practical
- How each shot will be achieved in VFX
- How each shot will work on the motional control rig
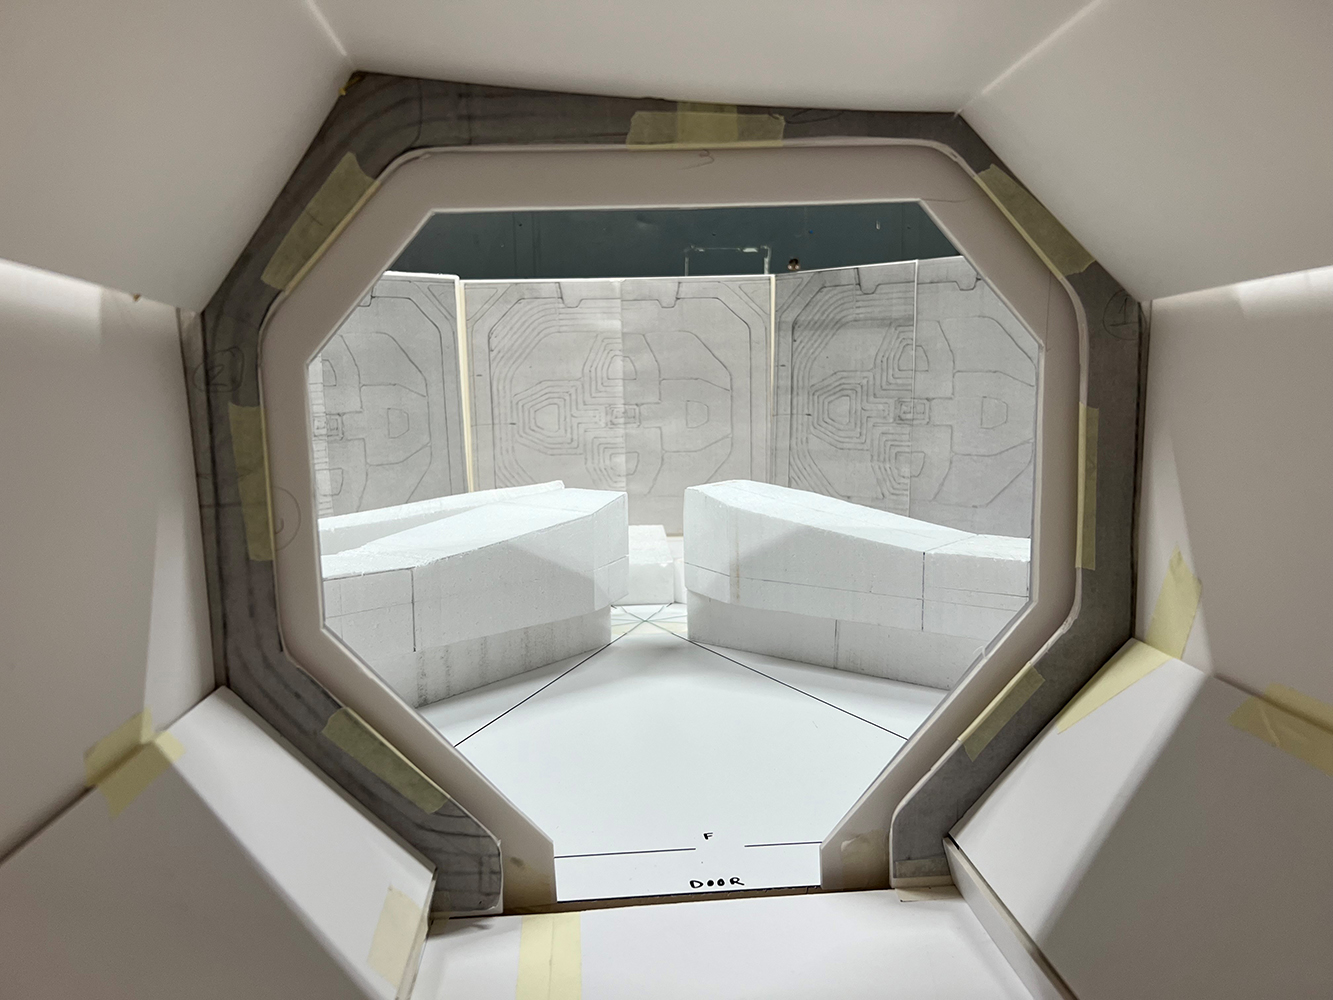
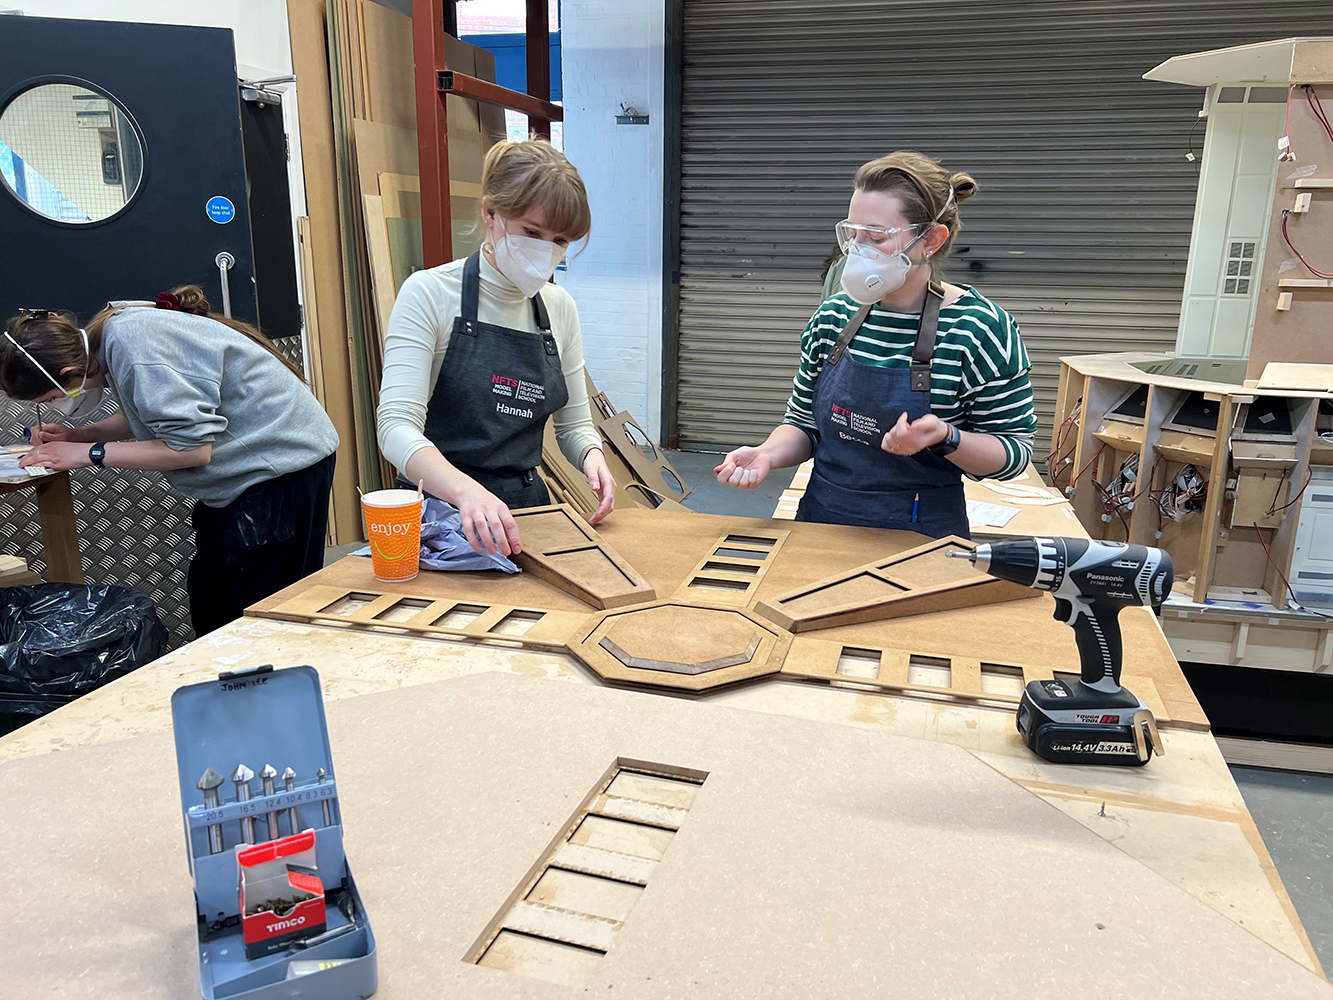
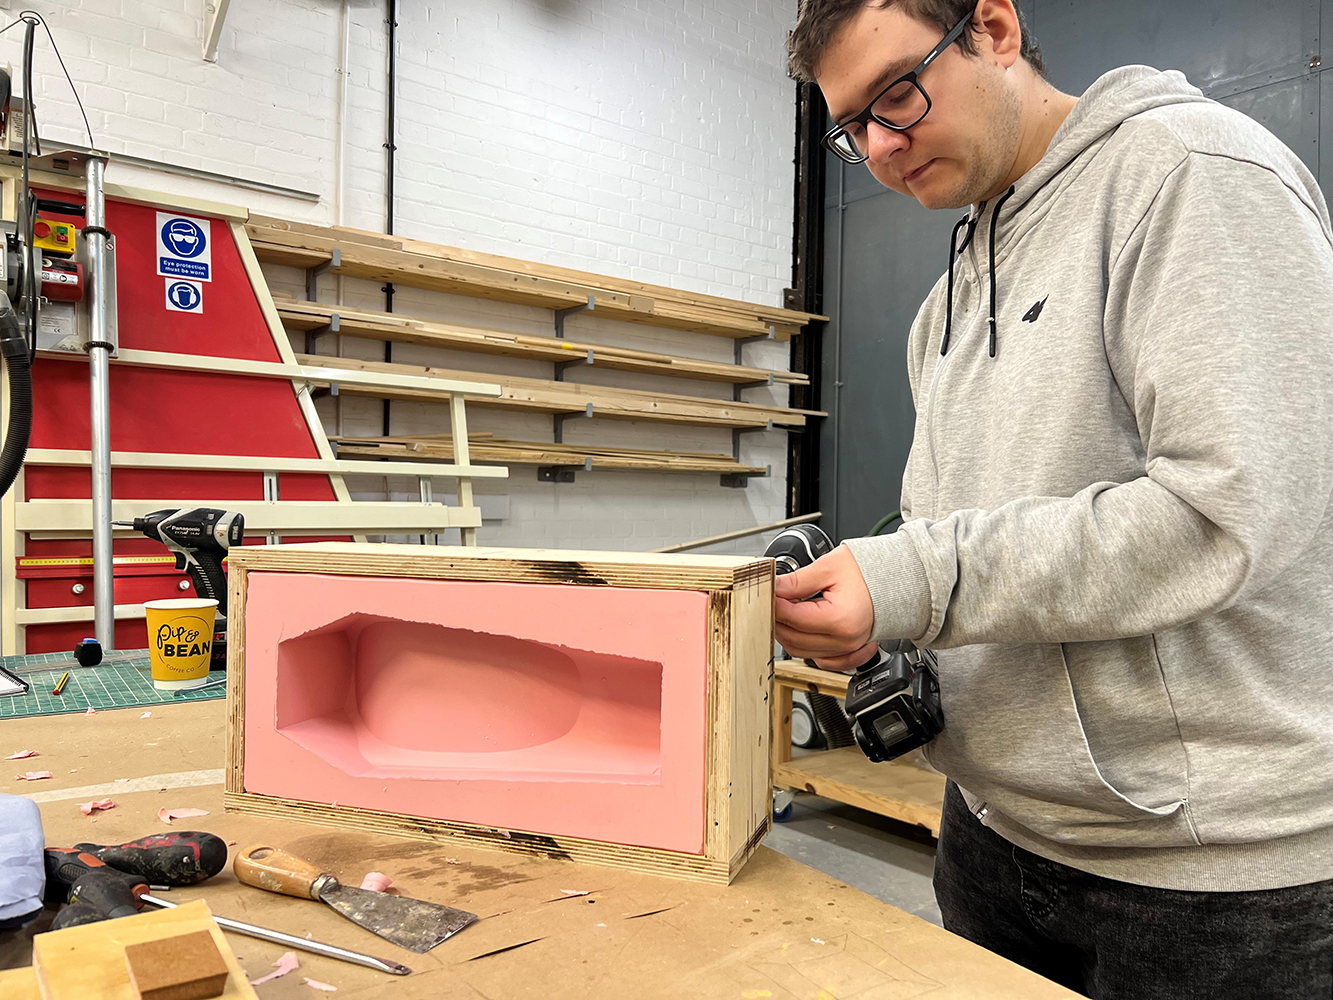
From a model making point of view, then, the early steps here were to break down the build into key parts: floor, walls, ceiling, corridor, pods and central hub with computer and rostrum. Some of the initial challenges identified for the build were the octagonal with repeat shapes and details. This meant that if anything was slightly out of alignment then it would not fit together seamlessly in final construction.
Another challenge was the ‘clean’ look of the hypersleep chamber, a hard thing to pull off in miniatures, since model makers do tend to love ‘dirtying’ up a model for scale and realism reasons. Also, the clear pod canopies had to be exactly the right size, allowing for vac forming and shrinkage from casting.
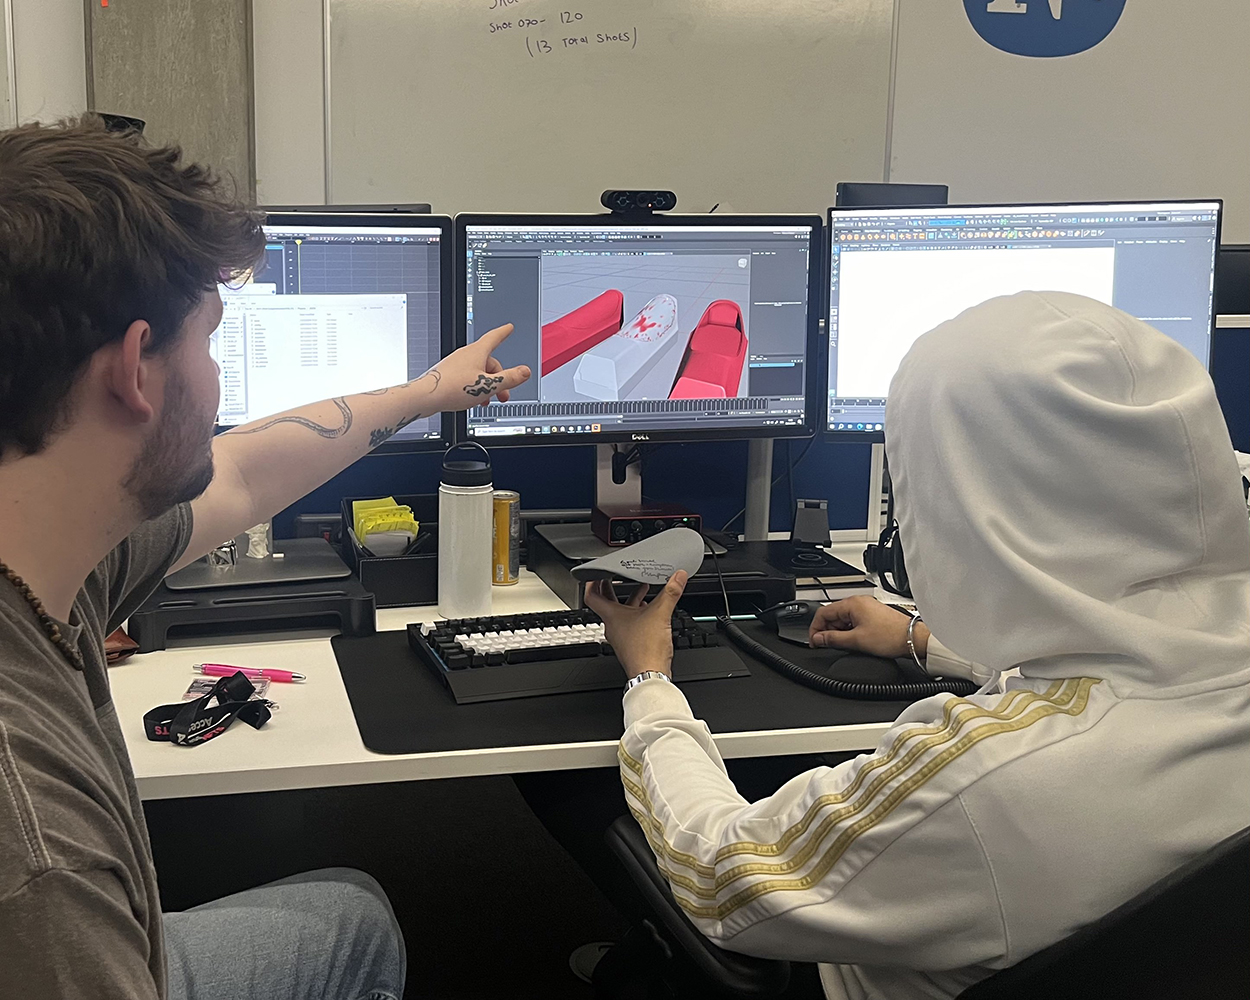
VFX student compiling tech-viz preparing for shoot.

NFTS Model Making students tackle the design process and white card maquette at the start of term.
White card maquette and roughed out pod iterations in polystyrene.
Model makers working on the white card maquettes and seeing the work come to life in 3D.
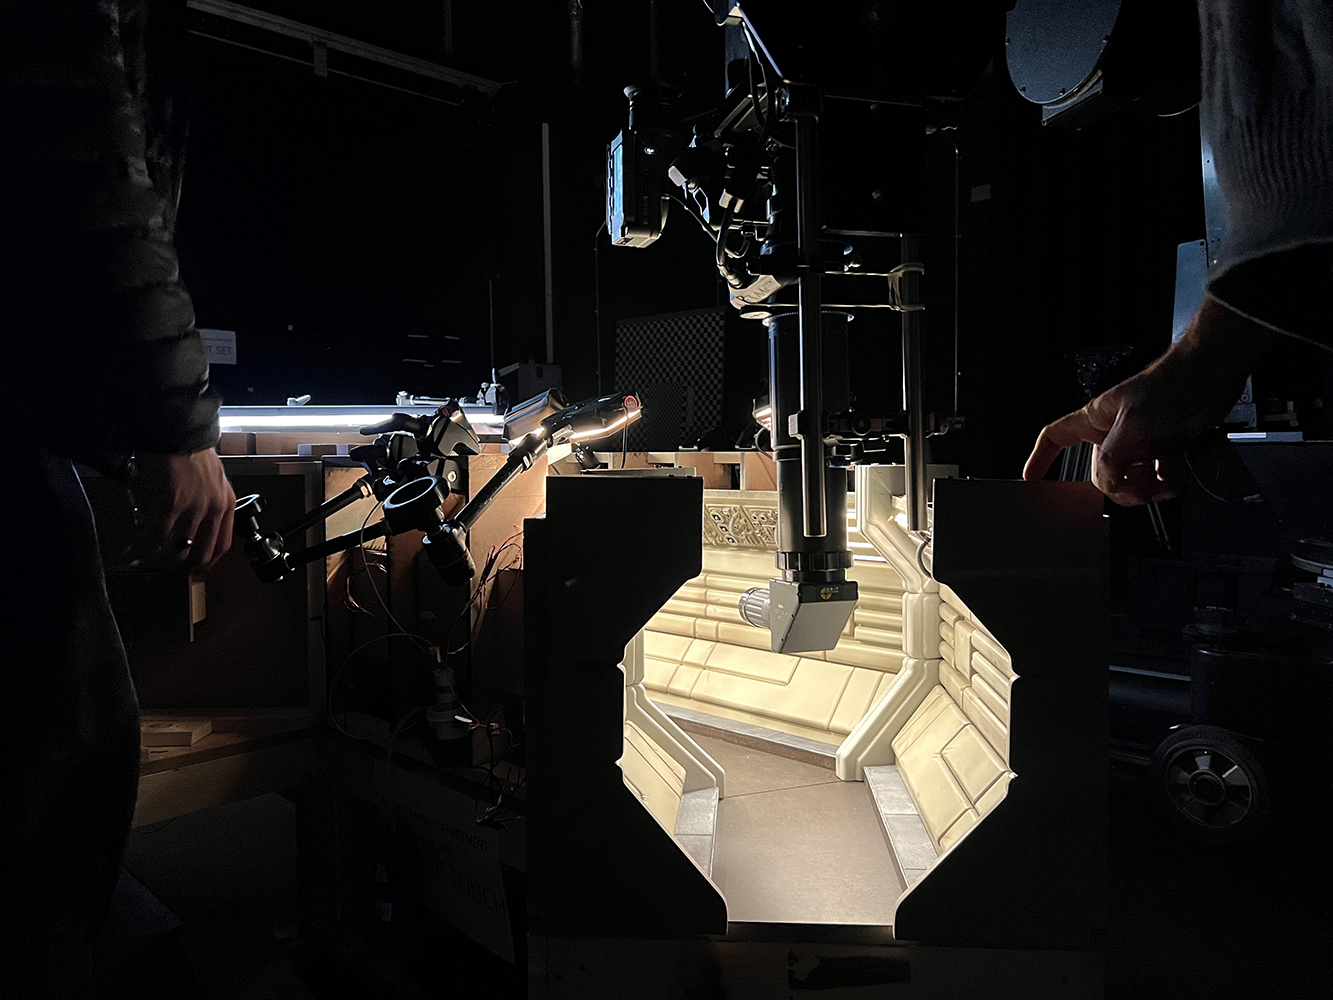
The Build: Central Chamber and Corridor
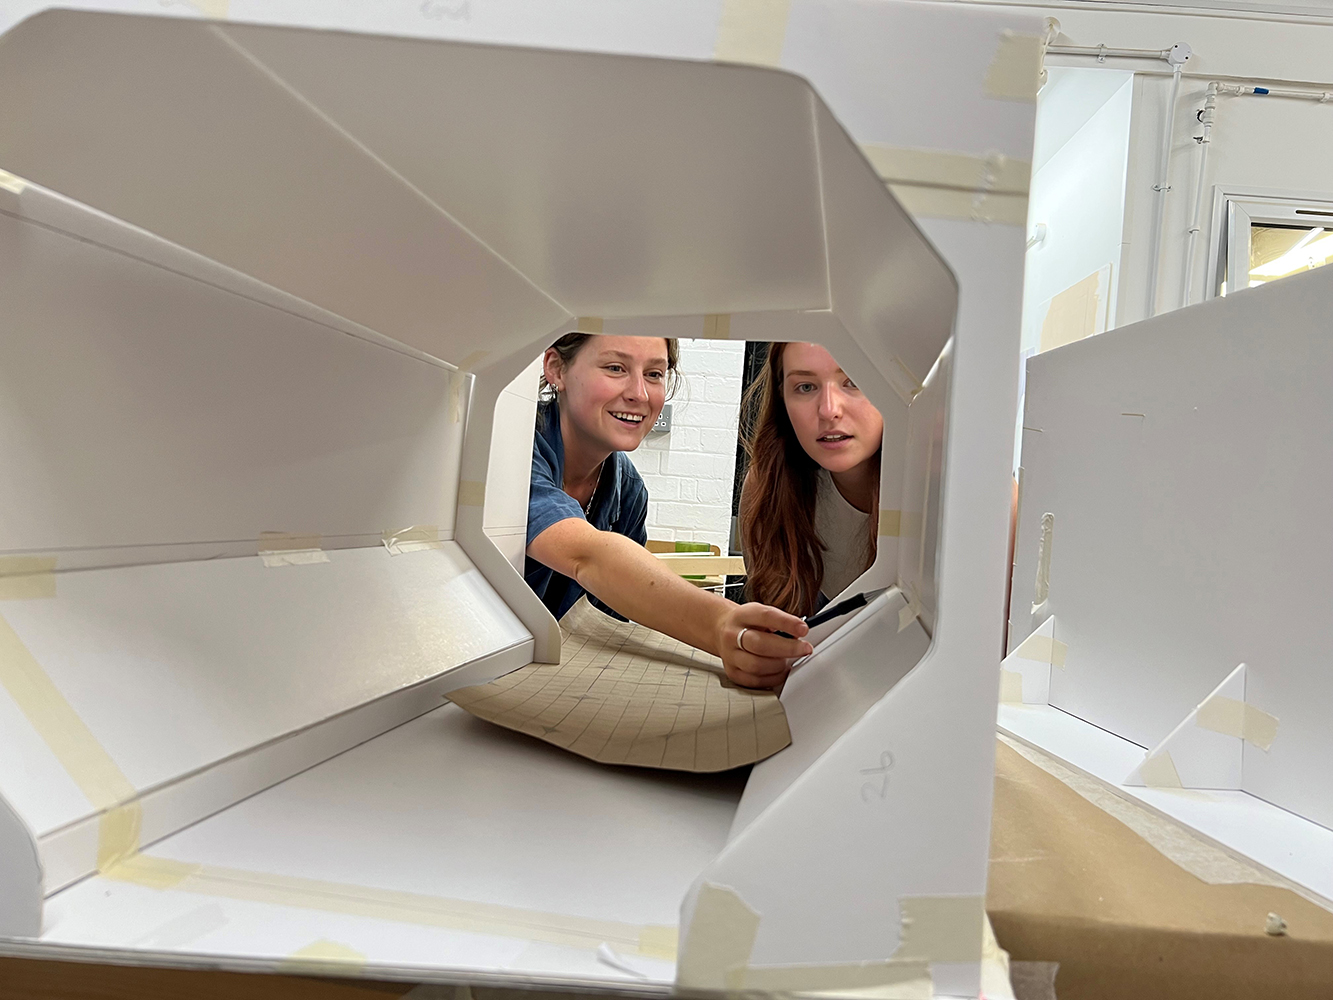
The central chamber and corridor area build began with a simple hand-drawn storyboard, plus detailed drawings of these elements. A 1:5 scale white card model was also made, accurate to proportion and space. The VFX students then checked that the previs model matched the practical model so both departments were working with the same space. Model making students then started to learn, in teams, how to use the larger tools and machines in the NFTS workshop, including all the carpentry equipment.
The central hub was fabricated in MDF, primed, filled and sprayed to match everything else. The central computer was made in several iterations, firstly in paper, card, MDF and styrene sheet to keep the sharpness, as the camera would be getting close to this.
“One of the hardest things to get right is the crispness and quality of the model making in close-up, otherwise it can easily look like it’s made from marzipan!” observes Lee. “The model making students did a great job on this and learned a tremendous amount of new skills.”
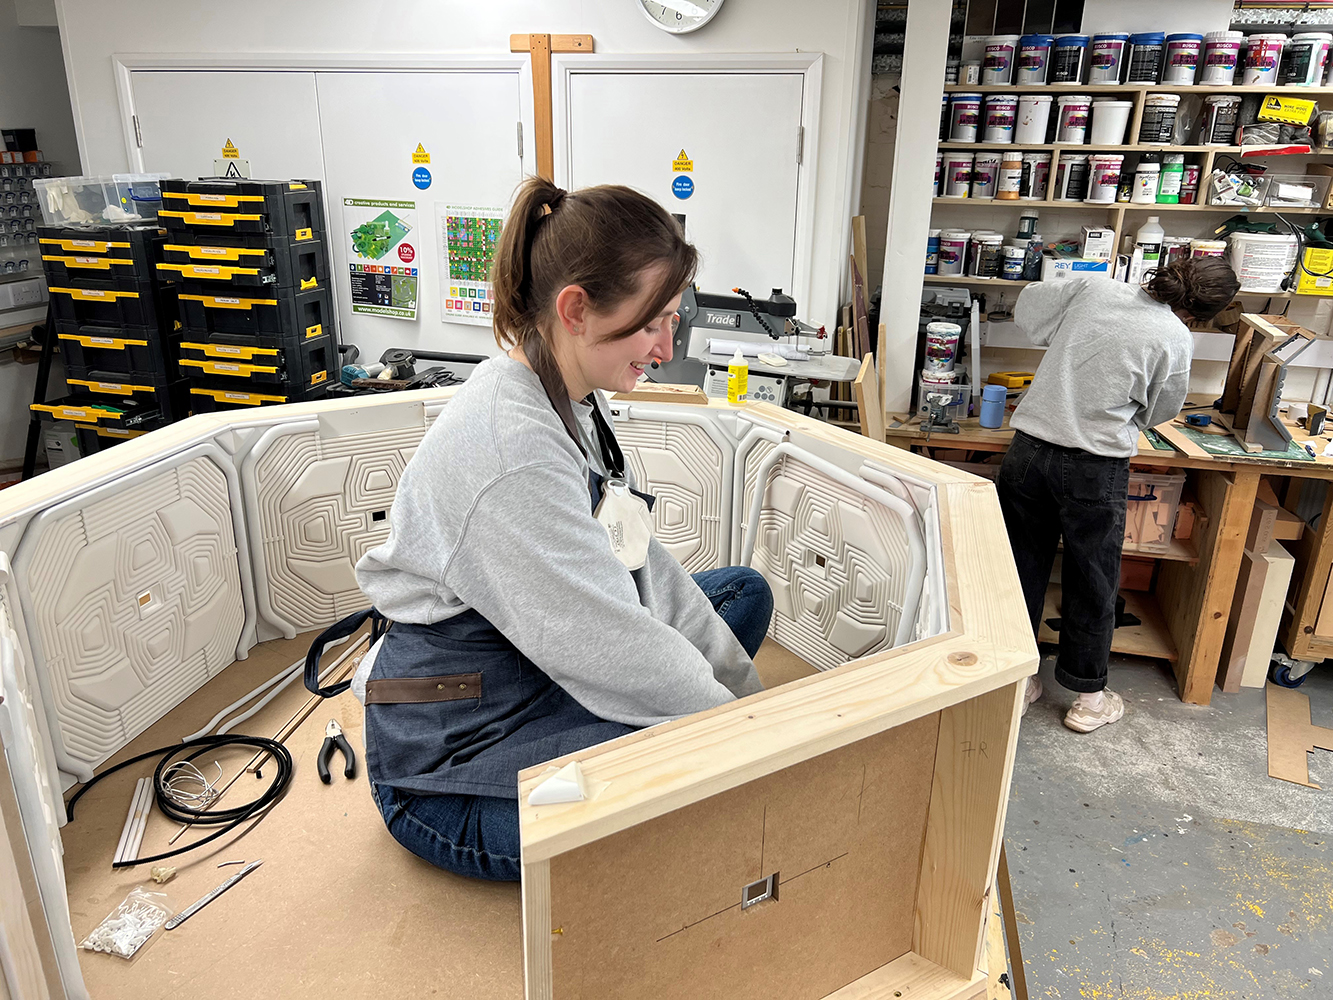
Practical LEDs were built into the set walls, computers, corridor and inside of the pods, providing a haunting red glow which features prominently at the end of the short film. Graduate model maker Tom Winfield was brought in to teach the students practical wiring skills.
At this stage, previs had allowed the teams to identify what elements needed to be digital assets. For example, the chamber door animates so it became a digital asset in order to control its movement and timing in the shot.
In the second shot, the corridor roof will be removed to allow the camera access, so it is replaced with a digital model. Other digital assets that were identified were: the hanging coat moves as the door opens, so all the coats become digital builds and the pod lids become digital to control reflections and animation.
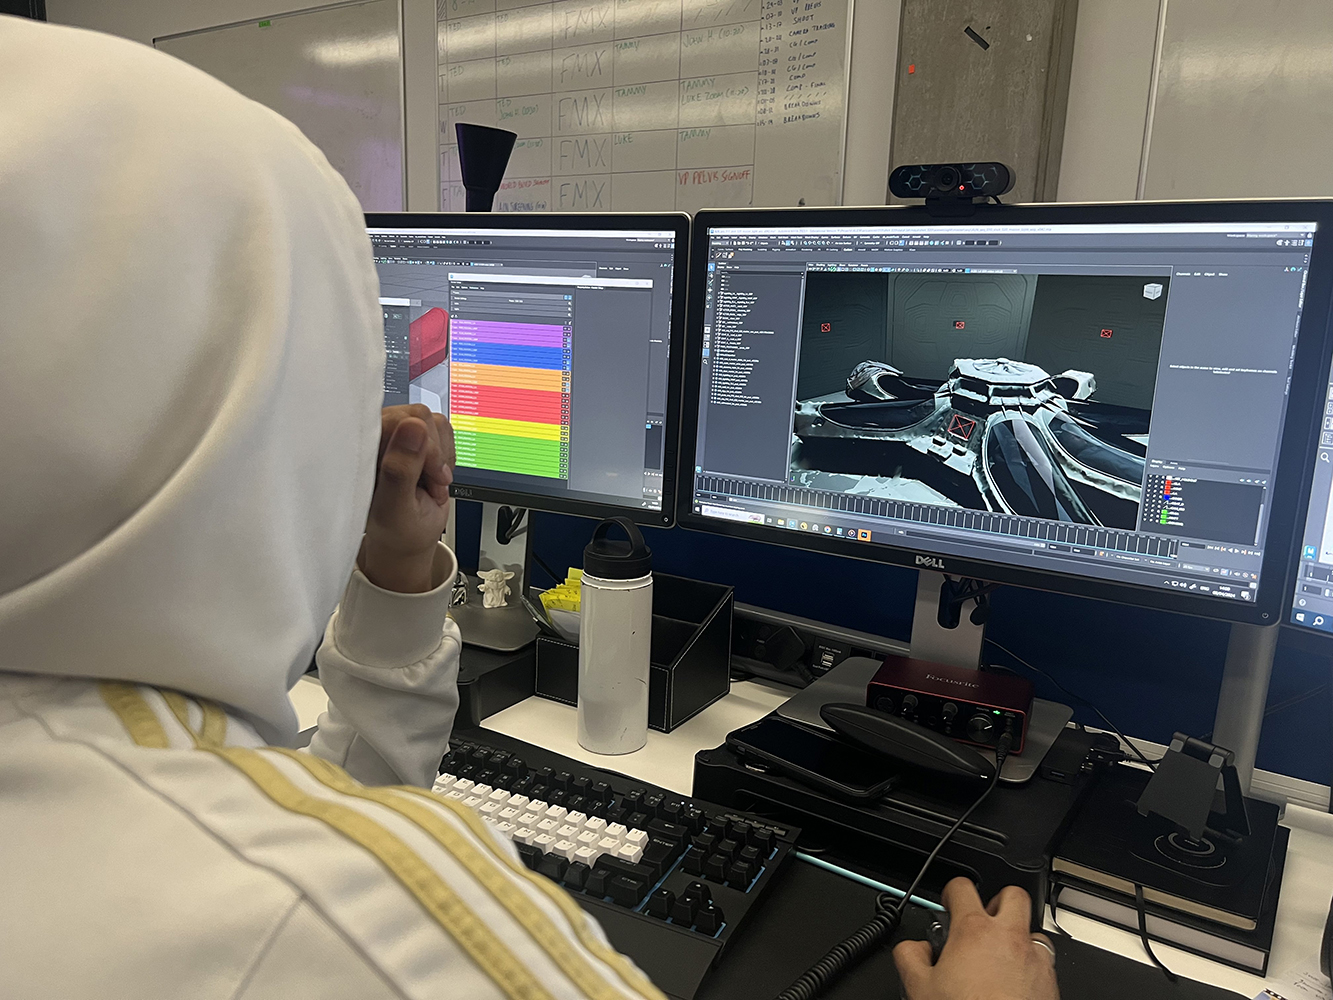
VFX students learned to create these hero assets through subdivision modelling techniques, look development, and rigging. They work closely with the Model Making students to match the digital assets to the practical set, focusing on how the edges react to light and the scale of the surface materials.
Students used Photoshop to prepare texture sources and then painted the 3D assets in Mudbox. One example was the lab coat, which was modelled as if fully inflated to ensure the correct shape and coherent surfacing. Then gravity was applied in Maya with NCloth to achieve a natural-looking starting point before final aesthetic adjustments were made. A simple joint-based rig was created by the students to animate the coat as the door opens.
Model making students working on the ceiling piece, which was split in two for camera and lighting access.
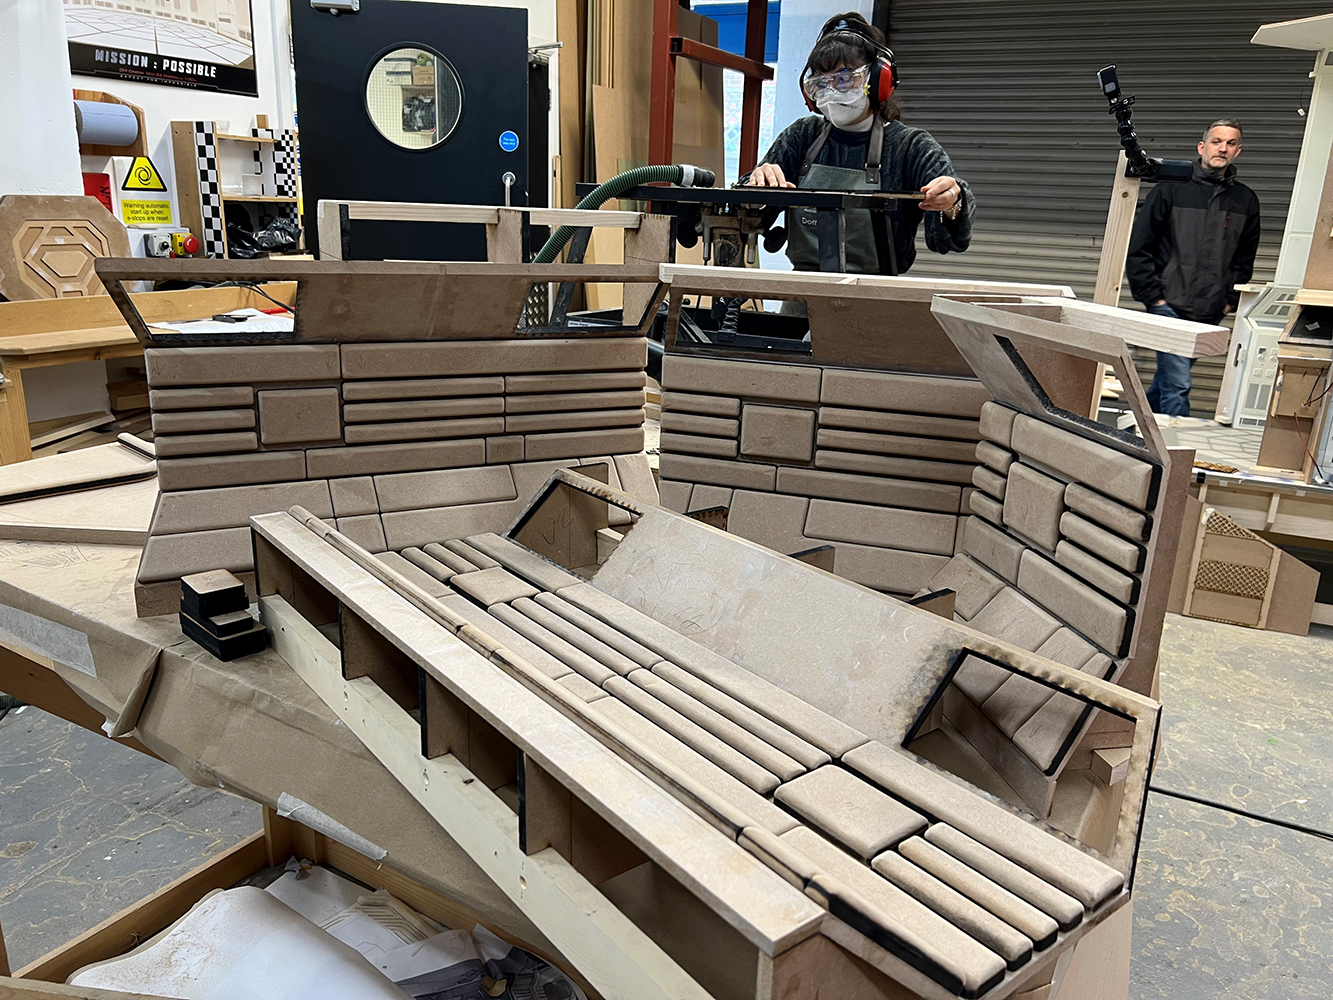
Model makers working on the corridor sections.
A model maker inside the 1:5 scale chamber, making adjustments to the curved pipes surrounding each section of the octagon.
Students assembling the walls of the model
The Build: Pods
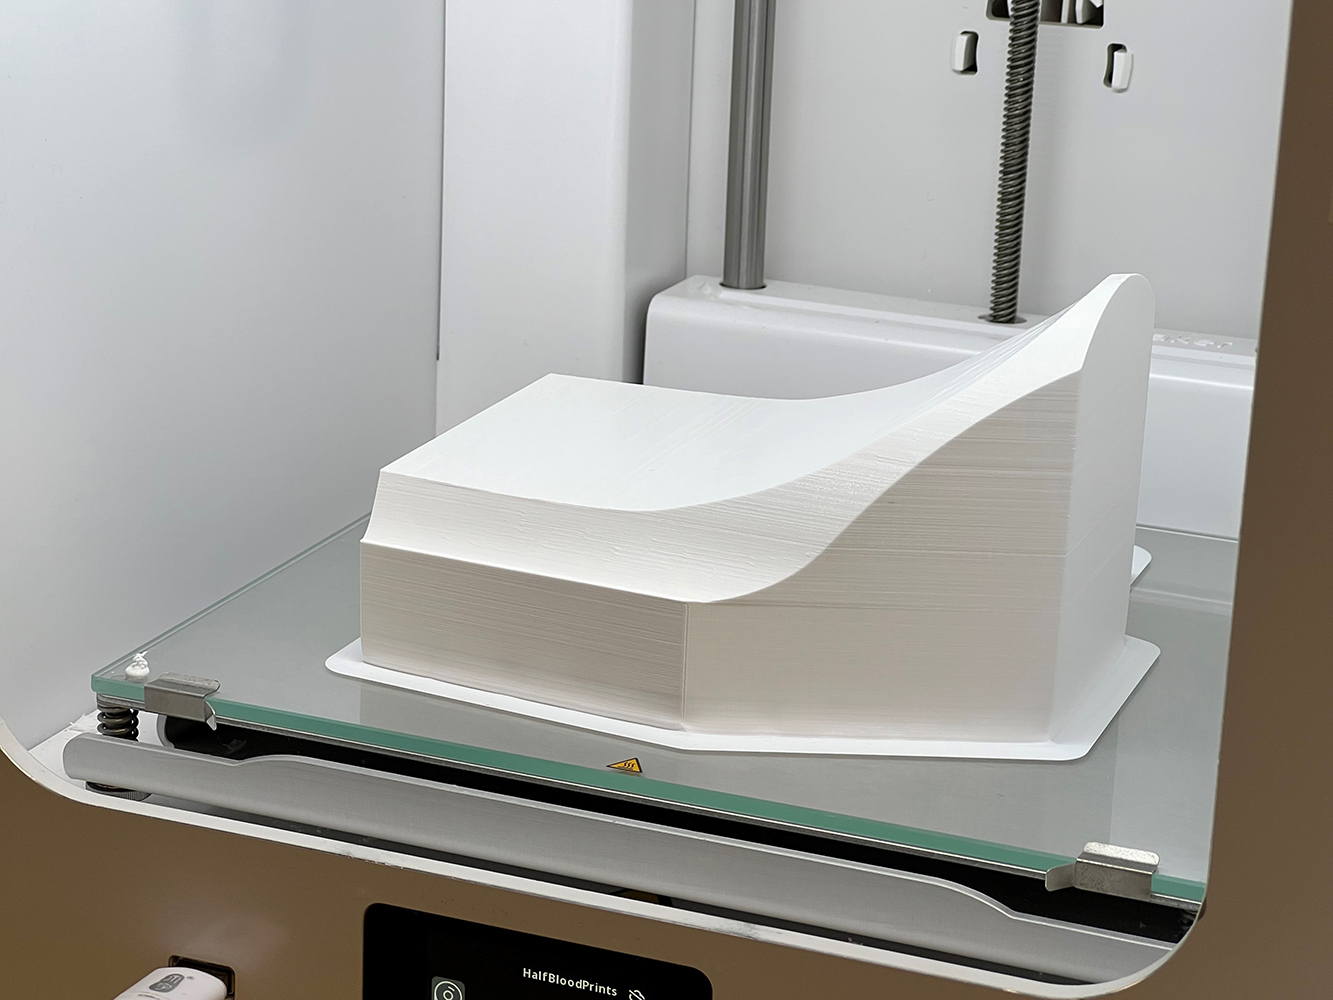
Following blurred technical drawings made by the art department back in 1979, the model making students drew the iconic shape of the pods in Rhino and made various 3d printed iterations until they found the shape that worked the best. A pod was then printed in two halves at 1:5 scale and joined together after clean up and 2k prime.
A robust silicone mold of the pod was encapsulated in a plywood box for casting. Once the pods were made up in tissue matt and fibreglass they were cleaned up, the opening removed and the interior parts made in fabric. The canopy lid was made from a second 3D print, which was cast in a hard resin and used as a vacuum form tool. The lids were pulled in 2mm clear acrylic and trimmed to fit the fibreglass pods.
The Model Makers 3D model of the pods and the canopy lids was used as a reference by VFX to build the digital asset of the canopy. “The pod canopy was devilishly tricky to create because the digital models’ complex curves needed to match those of the practical set exactly,” says Chaplin. “VFX worked closely with Model Making to ensure a good fit in the final shots.”
To fill the pods, VFX created photogrammetry scans of several students to place inside. The images used to make the scans were shot outside on a cloudy day, with the students lying on a desk to achieve the least directional lighting possible. The images were then processed in Reality Capture and retopologized the scans in Maya.
VFX students examining 3D printed pod lid.
3D print in action.
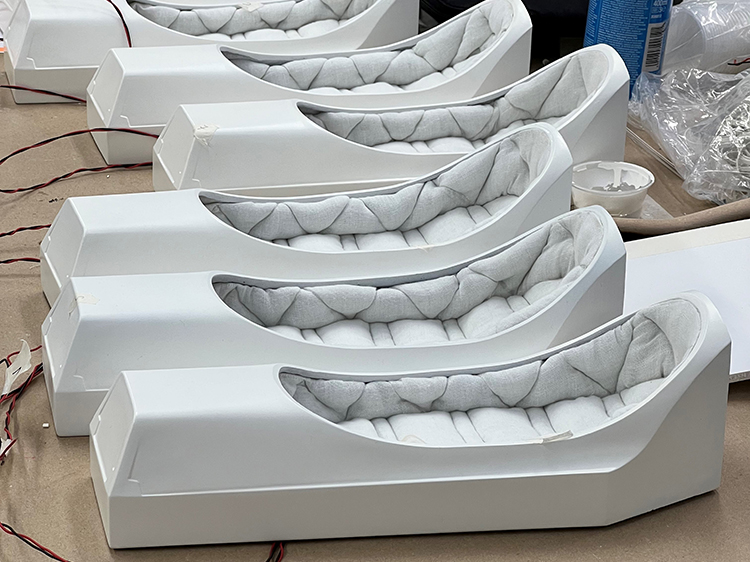
Interior pod fabric upholstery in a production line, including internal LED lighting.

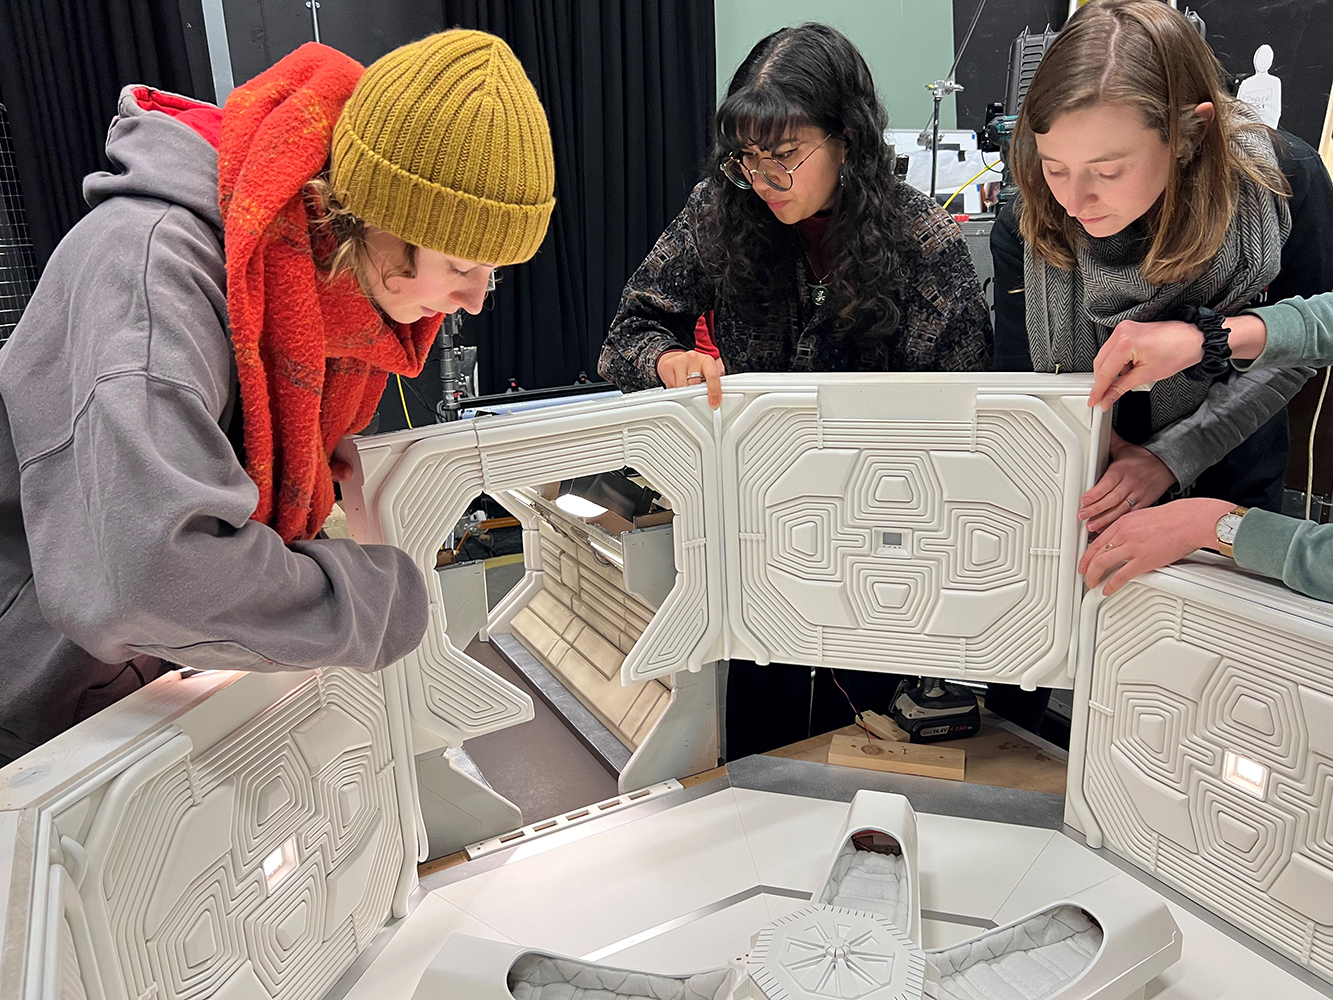
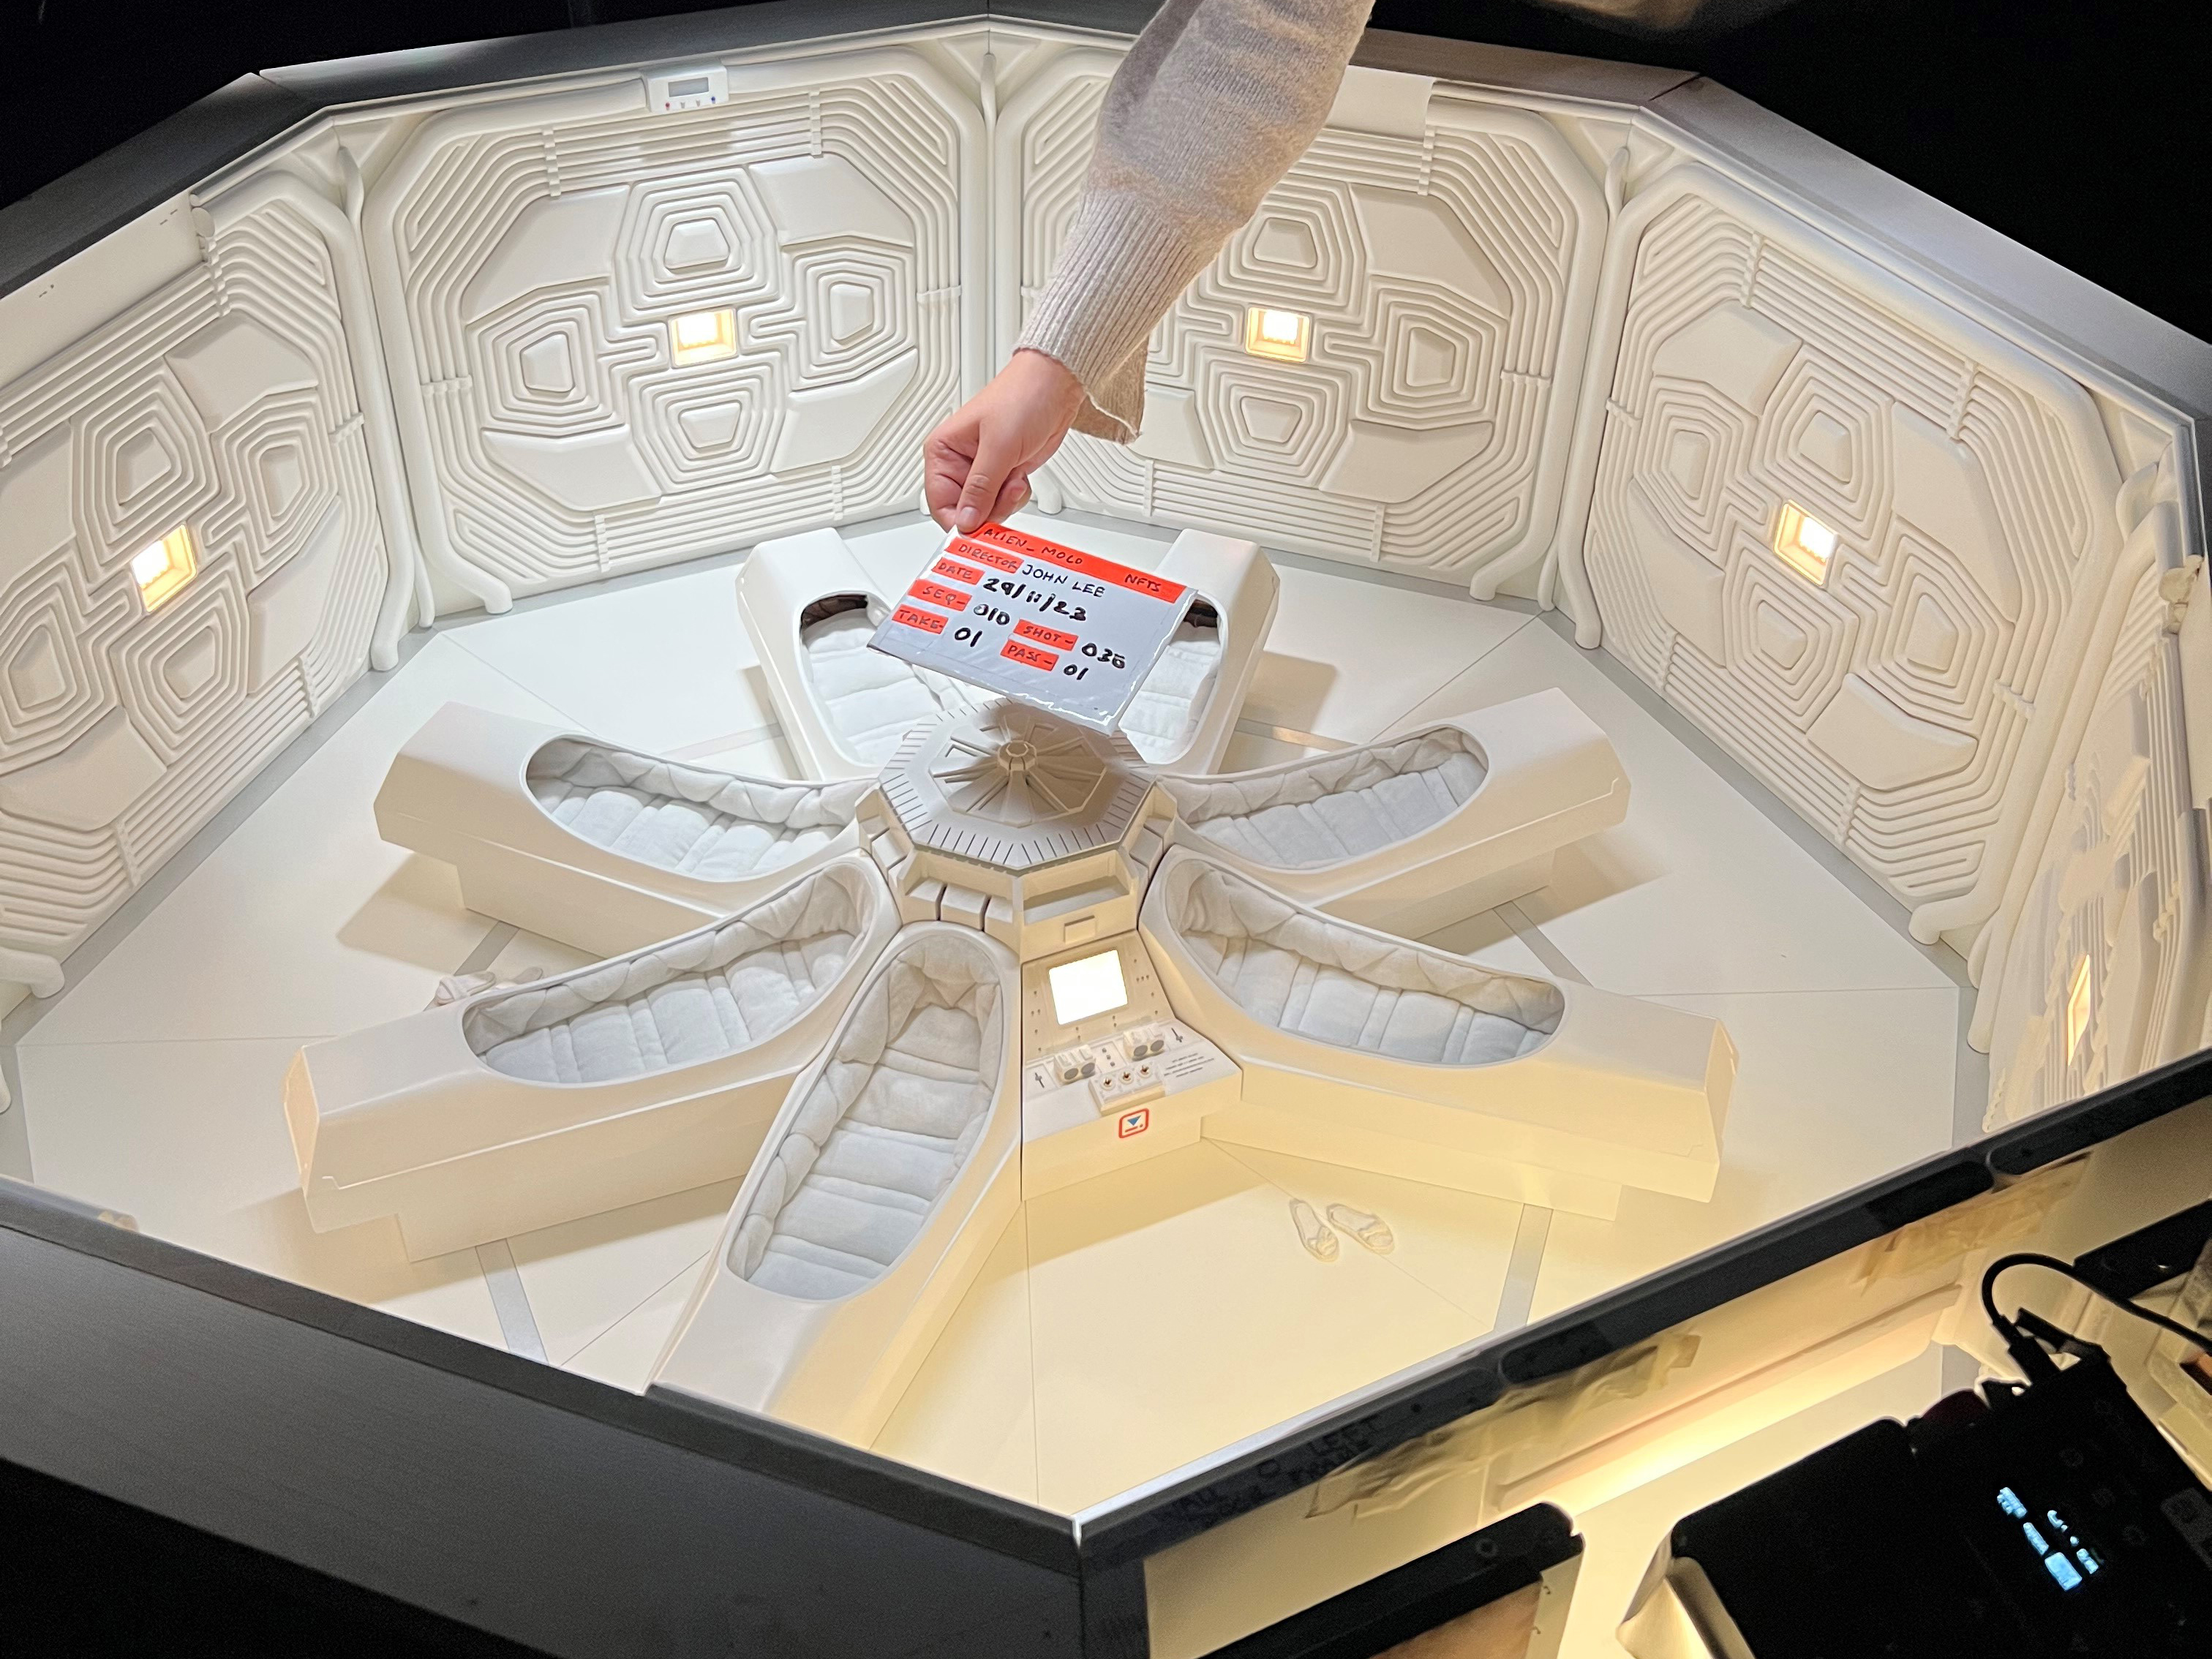
Six of seven pods aligned against the central hub and their bases. The students continually place all the items together in a dry fit to make sure everything fits together.
The model makers made additional small props to bring the set to life such as slippers. Jonesy’s cat box and other Easter Eggs form other parts of the Nostromo.
The pod mould box is made from high grade plywood and screwed together before lay up and then unscrewed to de mould the pods.
The Shoot
This year, the students were also tasked with shooting a live action sequence to include in the final film, featuring an actor (a Model Making student) in costume. This meant the students also had to create a 1:1 scale section of a pod, complete with interior padding. The benefit here was that seeing a real person in the pod (even though it is a miniature) helps to sell the reality of the scene.
Adam Pietkiewicz, a student from the NFTS Cinematography MA, joined the project to take care of on-set lighting and to get the opportunity to learn some of the skills involved with shooting with a motion control rig. The Milo motion control camera and track was supplied by Richard Widgery from Take4D and Graham Hawkins from 24/7 Drama provided the Optex Excellence Lens, a rare and sought-after snorkel lens.
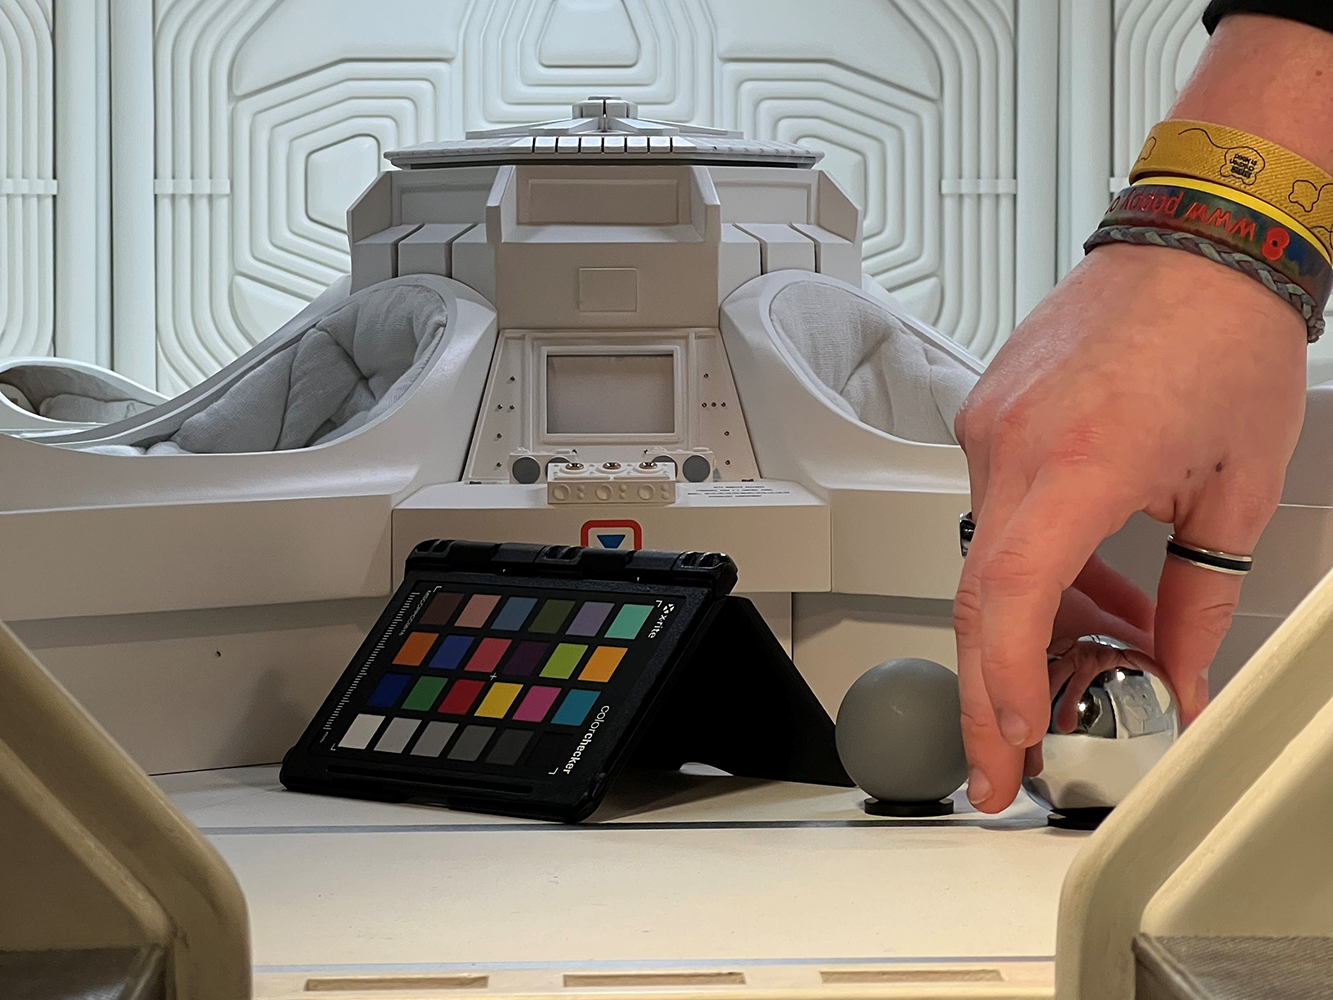
Before the shoot, VFX defined several passes to ensure all the data required would be filmed to build the final shots. Passes captured included multiple lighting variations, practical lights, camera tracking and lighting reference. Detailed photogrammetry was created of the practical set to track cameras and as a guide for set hold-out models for lighting and rendering. Lighting reference was shot with grey and chrome balls to capture the shot lighting. Lens grids were shot to capture the distortion of the lens so that the students could apply the same distortion to 3D rendered assets.
Snorkel lens from Optex making its way down the model corridor.
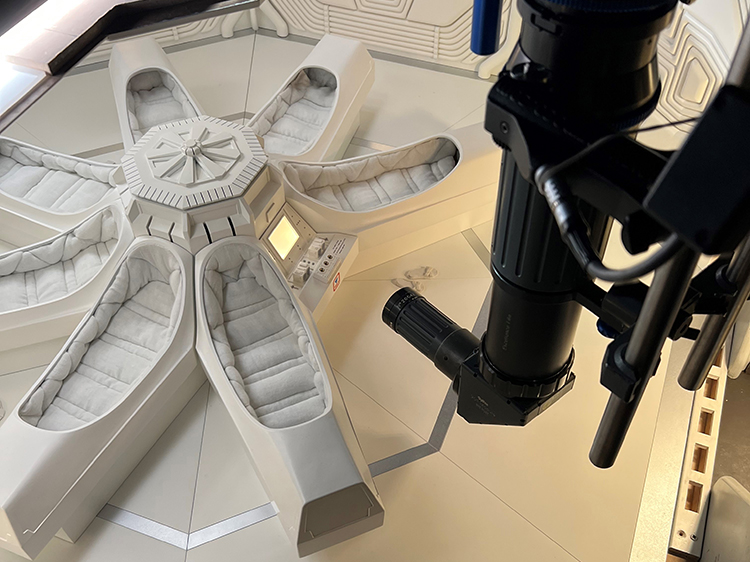
The special Optex Excellence snorkel lens supplied by Graham Hawkins on the Milo rig as it approaches the chamber pods.
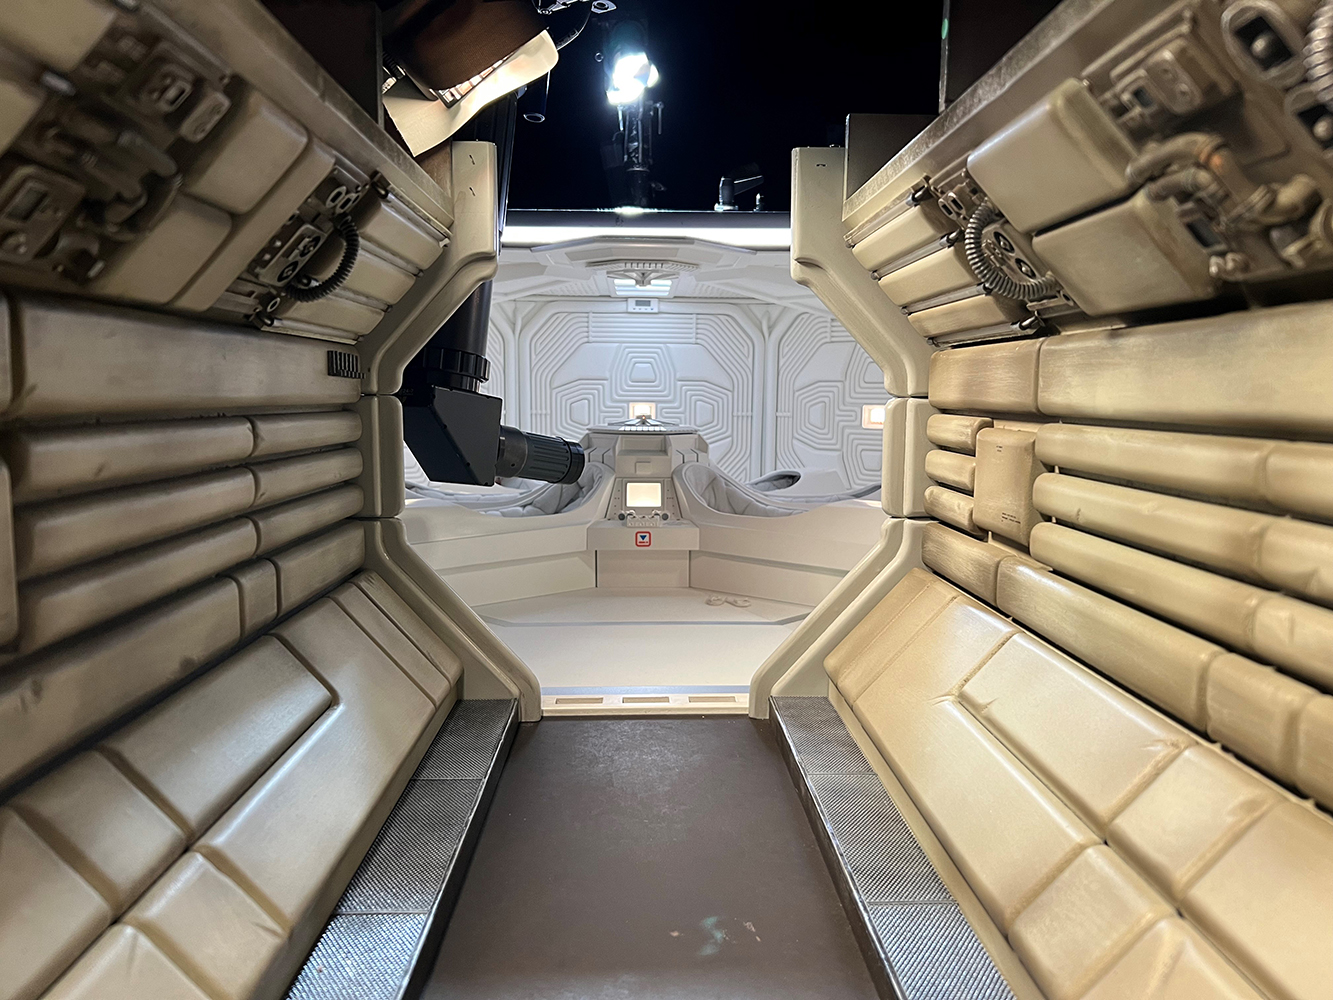
View of snorkel lens down corridor of model
Shooting the central chamber
Post production
Straight after the shoot, all the plates were conformed in Nuke Studio, allowing VFX students to deliver the data to a studio folder structure, accessible by all. On-set lighting reference and photogrammetry were processed and published as HDRI files and models in the studio pipeline.
A low-resolution set holdout model was created from the set photogrammetry to cast shadows and reflections for lighting. The cameras were tracked using the set photogrammetry model, the set hold-out model and the lens grids. All digital assets were reviewed and checked at this point and then published in the studio pipeline. The VFX team created and kept track of over 350,000 files.
Lighting set-up began with published assets including cameras, look dev assets, and set hold-outs models being referenced into the Maya lighting scene for each shot. Throughout the lighting process, students created and managed many specific render layers and AOVs to render the 3D assets in each shot.
Each shot was rendered first at low samples to output slap comps as soon as possible. This was done to see what the team would be working with and to resolve any rendering issues. The pod canopies proved to be quite tricky to render and composite because of their transparency and the fact that they overlap with each other in multiple shots. To solve this, the students rendered multiple passes and then reassembled the data in Nuke.
The students compositing the shots loaded multiple passes of the plates in Nuke, which allowed them to animate practical set lights after the shoot based on the director’s feedback.
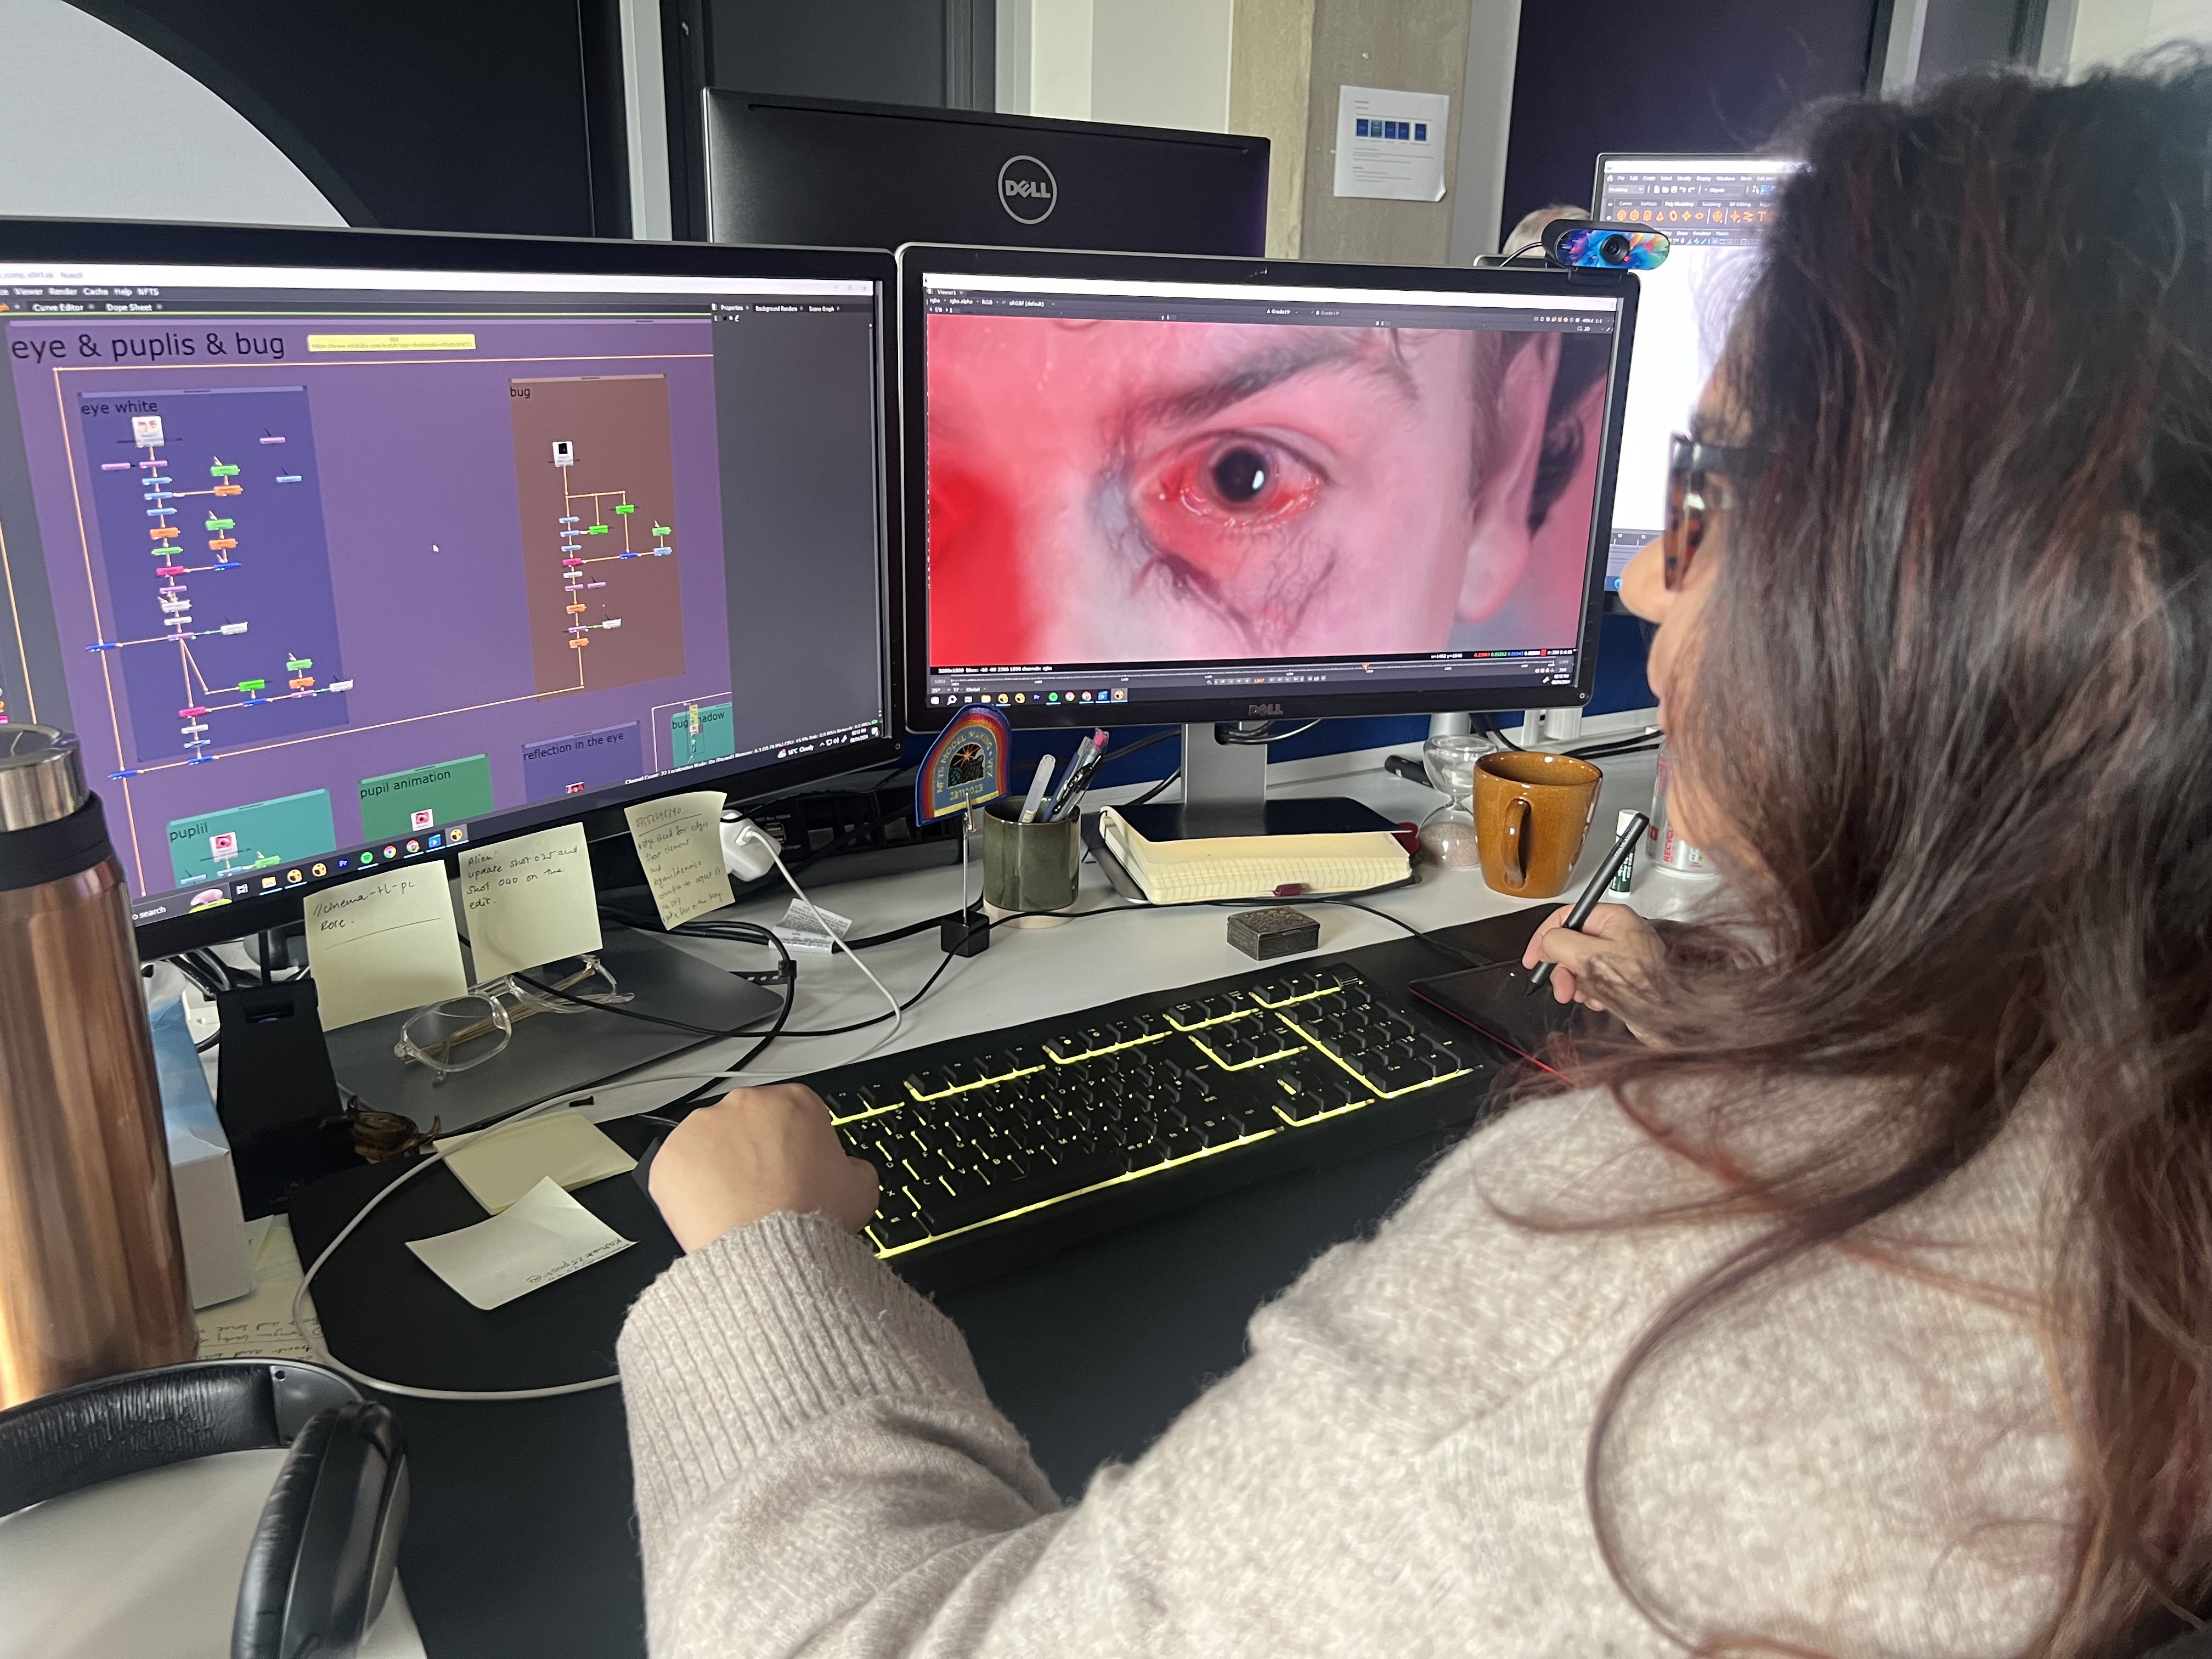
The 3D renders were then integrated into the shots and matched to the motion control plates. Creative additions were made, like the pulsing red lights inside the pods, and the practical screens were replaced with carefully crafted graphics to match the original film’s style. For the final real-scale shot of the actor, VFX added details under his skin and in his eyes in Nuke.
VFX student testing photogrammetry with the CG pod lids.
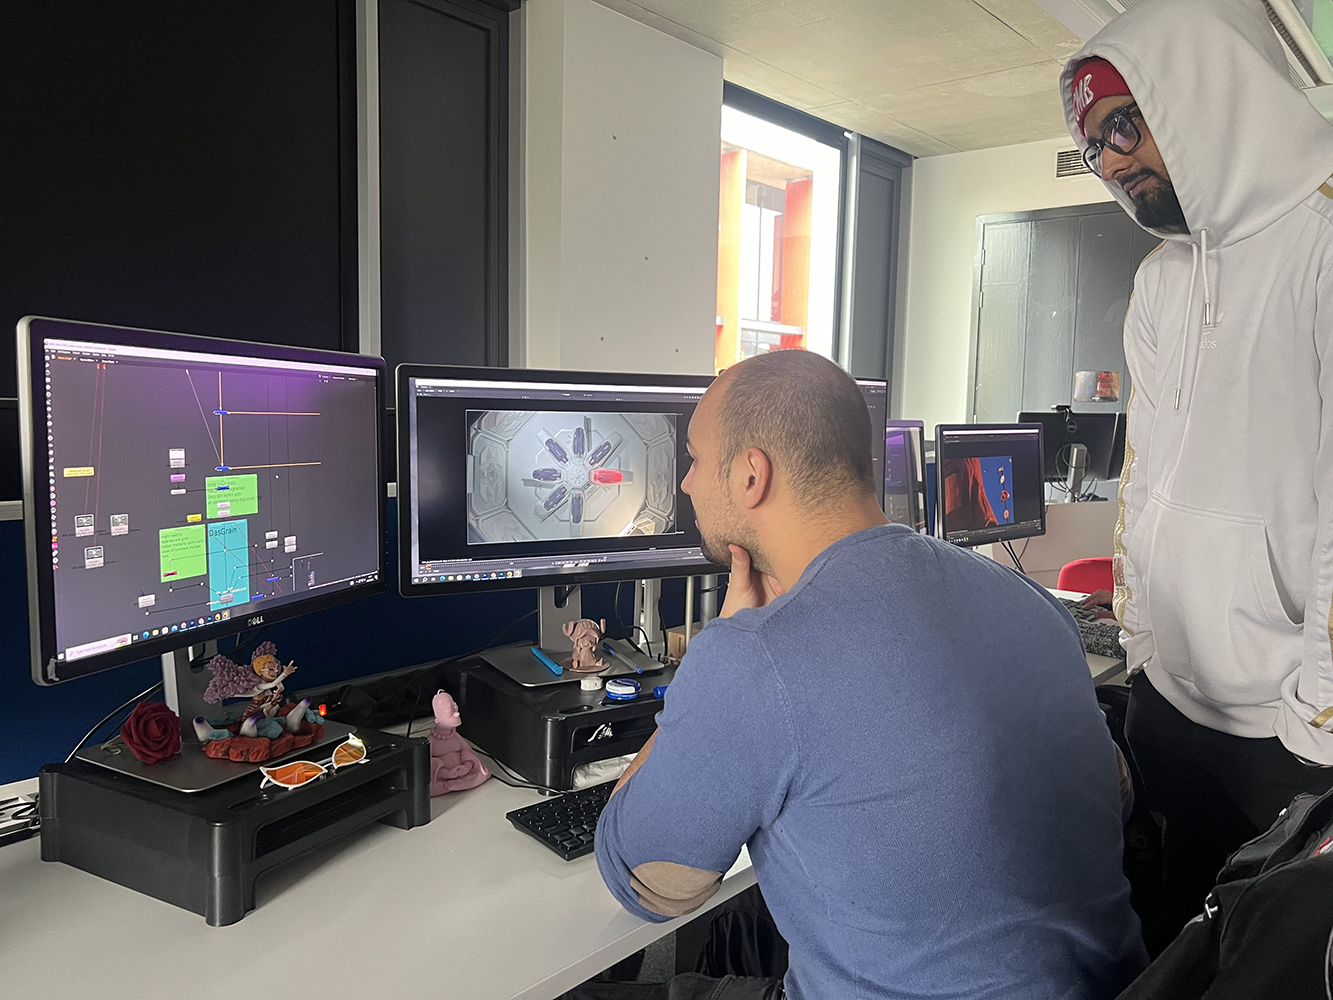
VFX students discussing CG integration.
VFX student working on 2D compositing.
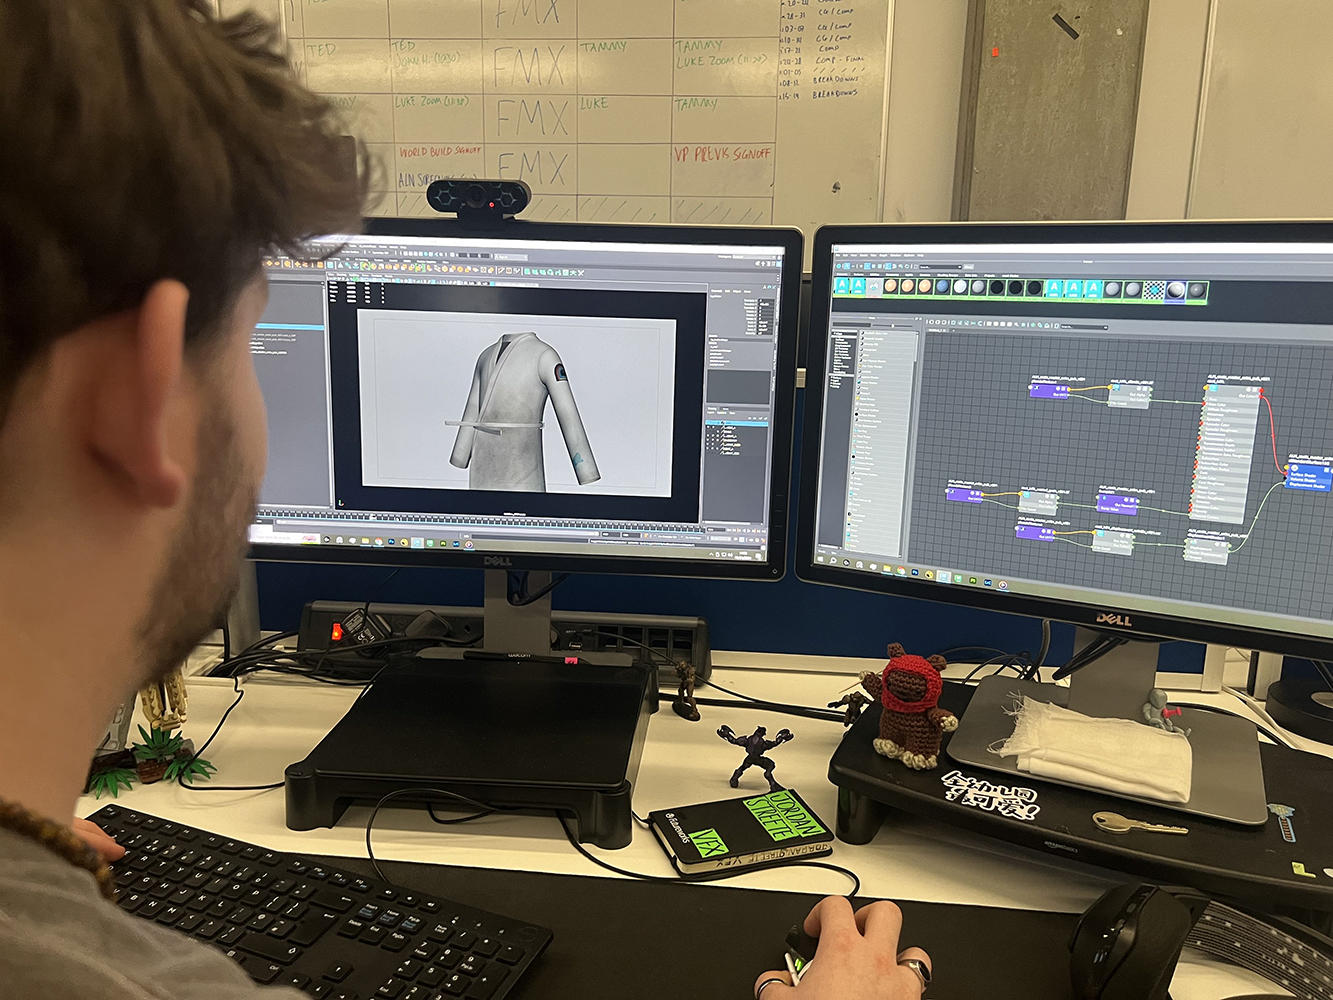
VFX student testing coat texture.
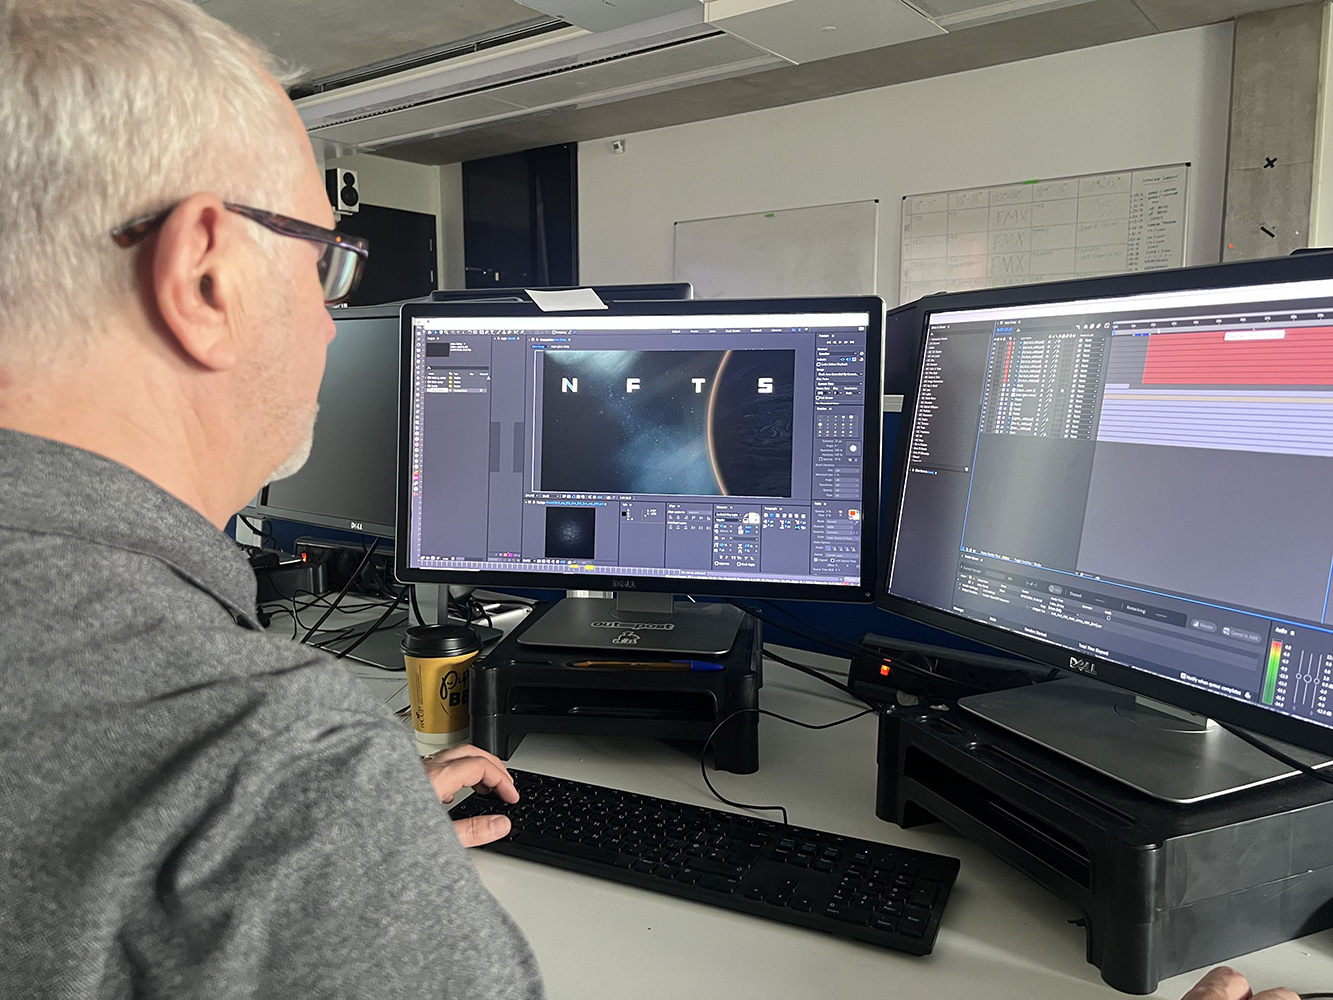
VFX student working on the opening title card.
Final details
The model took around 6 weeks to build with a team of 12 model makers. A team of 7 VFX students worked full-time on the project for 20 weeks. You can see more behind the scenes in this special NFTS video breaking down the process, below.
Behind the scenes on the making of the miniature replica set.
Watch the final film.
This story was originally published by befores and afters.
Applications are open for highly practical courses at The National Film and Television School including the Model Making Diploma and Visual Effects MA.
nfts.co.uk/modelmaking
nfts.co.uk/vfx
Follow in our alumni footsteps and train to pursue a career working on iconic films and franchises like Alien. Visit nfts.co.uk/courses to find out more.